Plate Armouring Journal
April, 2001 - Present
~Early 16th Century Armor~
Work on this part of the armor has halted for now. I am not entirely happy with the articulation of the paulsrons or that they swallow the besegues. I want to rework the leather articulation a bit, and also find a better way to suspend them from the pins that are hinged to the gorget. However, work on those parts has stopped for now, in favor of better protecting my knees and shins, which with the armor as it is now (March 2002), are completely unprotected. I consider myself lucky to have not recieved some sort of injury from a sword to my knee.. though I have managed once to bash myself on the left knee while fighting with sword and buckler. No serious damage, but the next few fights were rather painful and it was prolly easy to see that I was limping pretty bad... so better lower leg armor will be started on in a couple days.
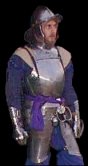
Most current pics of harness
Pictures from the July 29th(2001) demo at Fort Knox
~~~~~~~~~~~~~~~~
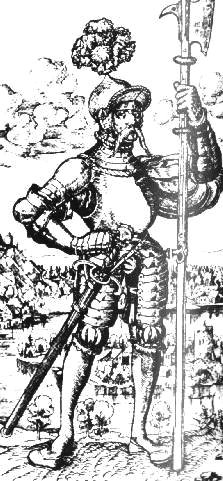
a
woodcut
and another
woodcut
showing armor similar to what I am making.
~Day 1~
1st of April, 2001
7pm to 11:00pm
I started on a new project tonight. It's an early 16th century armor that will consist of a breast and back plate (might not bother with the backplate), gorget (the 16th century gorget I made last month), "lobster" tassets to just above the knee, and a pair of arm harness. With this armor, I also plan to use my pikeman's pot (at first I thought this style helm was to late, but then I saw one of the kettle hats in Edge & Paddock.. the two styles are very similar and I wouldn't be suprised if the pike-pots and morions developed from the kettle hat) and my finger gauntlets (the gauntlets of doom!).
Tonight I drafted the pattern for the breastplate. I realised the pattern was to big to fit in the band saw and the beverly shear was burried in the snow so I decided to go with a two piece pattern. I took my original pattern and scrawled a curved line from the top-center portion to the bottom-center. My plan was that when the two halves were shaped and fitted together, the curved line that was drafted down the center of the old pattern would match the curve of the front of the breastplate's profile. I cut out my new pattern for half of the breastplate, traced it out onto another piece of pattern material and taped the two together up the center and checked the fit. It seemed to have too much of a ridge so I cut down the curve a little, tried it on again, cut it down some more.. and kept doing that until I thought I had the fit right.
I should have mentioned what measurements I took for drafting the pattern. I added a couple extra inches for to all measurements to allow for padding, and about another inch in some places cause it's easier to cut the extra metal off than to add more on.. measurement of the waist (waist is navel level), cut in half cause it only goes halfway around the torso: about 19 to 20 inches. From navel to a couple inches below the neck (extra was added to the top of this to account for the large roll on the top edge: 14.5 inches. For the top edge of the breastplate: held arms out in front of me and measured the width of my chest where plates would not poke into me if I tried to touch my elbows together: 9.5". On the side of the body at waist level, measured the distance from waist to half way up to the under arm: 6.5". Thats it for the measurements I took. Not sure what to say about putting them to paper and making a pattern.
I traced out my new pattern on some 16ga hot rolled and cut it out on the band saw, cleaned up the edges with 120 grit belt on the big belt sander, and started shaping. Shaping was tricky at first, I had never worked with two pieces of metal this large and it was a shape I had never done before. Gregory came down to the shop and looked at my two pieces with a "what the heck are those supposed to be" sort of look. I showed him how I had planned on them fitting and he gave me a few ideas about shaping. It helped a lot and I soon had the two pieces shaped so the center lines touched at the top, bottom, and slightly below the middle.. with big gaps in between. I did tack welds at each of those points then went to pounding the gaps closed. After a few hits, the top two tack welds broke and the pieces sprung open almost ripping the bottom tack weld apart, so I went ahead and broke the last tack weld. I then noticed that my pounding that broke the welds closed the gap between the bottom and center tack welds so I welded that section together. I found that with the bottom four or so inches welded, I could shape and weld my way up the rest of the way fairly easily. Once I had the two halves welded together on the inside, I turned it around and welded on the outside.
I know had something done that looked like a breastplate... a very pointy wedge shaped breastplate. The two halves came together at about a 60 to 70 degree angle. I didn't really think that looked right so I started taking out the steep angle by going over it with a rawhide mallet over the ball steak until it started looking better. Then I placed the top portion of the breastplate on the dishing stump and flattened out the steeply angled center ridge until I thought it looked right. Looking over the surface of the breastplate, which had been slightly dished before welding the halves together, I noticed many spots where it looked too flat so I started on some light dishing and that's where I am now.
I also tried the breastplate up to myself and figured out that I need to cut down several places. I need to cut down the area under the arms about 1.5 inches. I need to cut the top edge of the breastplate so the appex of the curve faces up instead of down.. good thing I added the extra inches to that part of my pattern... and I need to even up the bottom edge of the breastplate by trimming off about half an inch in some places.
...and thats not all, I'm not close at all to being done with this. I'll need to clean up the weld on the front.. make the gussets, rolls, start the fauld, drill holes for other stuff, and rivet some stuff. I'm not sure what I'm going to do with the mill scale. A while ago I wanted to do a black and white harness and if I did that then I wouldn't have to clean off nearly as much scale.. but that wouldn't match the rest of what I have done. But hey, a gainfull opportunist mercenary like myself would prolly have whatever could be picked off the battle field that fitted and was in good condition to replace my own armor parts that did not make it through whatever battle I've dragged myself away from. If I do make this one a black and white harness, It will not be the standard one seen in most pictures of black & whites, but it won't be one of the really fancy floral design ones either.
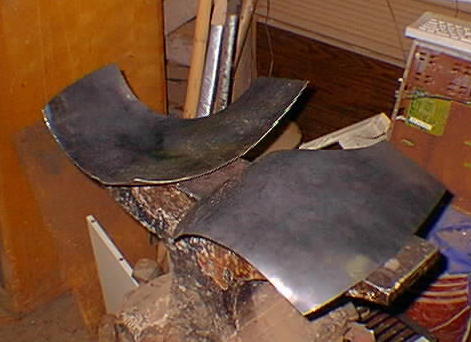
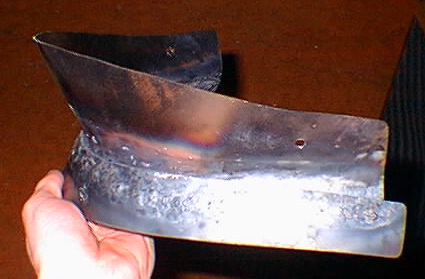
Picture
of the two halves after my initial shaping and before welding them together.
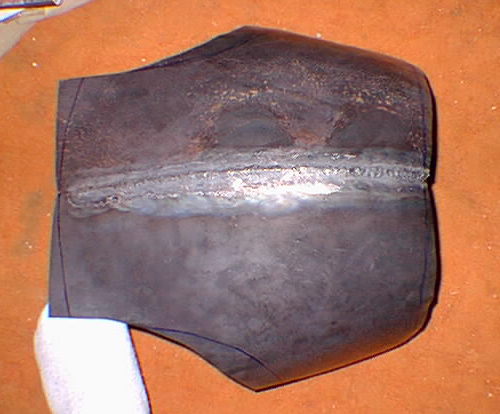
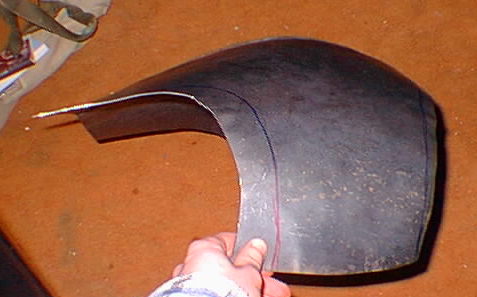
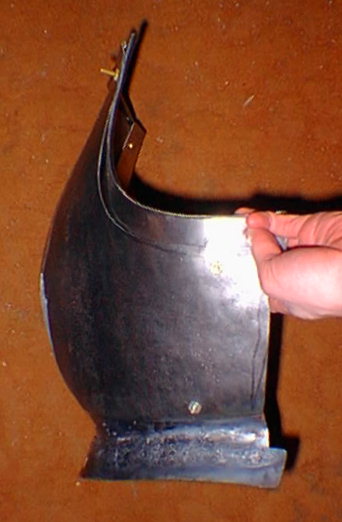
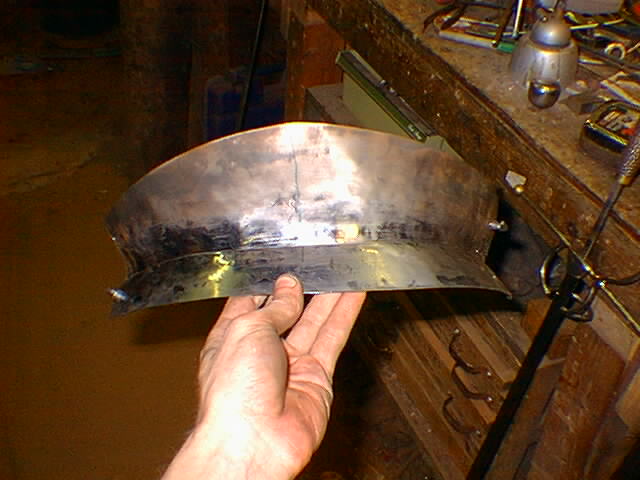
Picture
of the breastplate from the front with both halves welded together. The lines drawn on the breastplate, if you can see them in the pictures, show what I am going to trim from the edges of the plates.
Picture
of the breastplate in profile with both halves welded together.
~~~~~~~~~~~~~~~~~~~~~
Early 16th century armor
~Day 2~
3rd of April
3pm to 12:00 midnight
Today was a pretty good day in the shop... I started out by doing a little light dishing on the breastplate until I thought it looked about right. Then I enlarged the armholes.. I had to remove about an inch of 16ga steel around the lower front/sides/bottom of the armholes (sort of a crescent shape, or more like a banana with one end bitten off...). The first armhole I enlarged with the big belt sander and a 36 grit belt. It took more time than I really wanted to spend on the next armhole so I enlarged the other one with the band saw.. don't know why I didn't think of that to begin with. I also used the band saw to trim down the top and bottom parts of the breastplate that in the last post I mentioned needed to be trimmed a little. The black finish on hot rolled steel buffs up to a nice glossy black but I've decided to go with the shiny steel look instead of the black and white (someday I'll make one...). Gregory said that he had some acid (can't remember what it was, muriatic or sulphuric.. also can't remember how to spell) that would take the black scale off, but that it would be better to wait for a warmer day to do it. So I started on the back plate. Like the original pattern I made for a breastplate, my back plate pattern was also to large to fit into the ban saw.. but since backplates are mostly flat with a little dishing and bending, I thought that making a back plate in two pieces would be a little silly (another long weld to clean up...) so I went out side and dug the beverly shear out of the snow and found it's handle. I made the backplate out of 18 gauge cold roled, rough shape cut out on the B2 Beverly shear and finished on the band saw.. used the big belt sander (prolly with a 120 grit belt) to clean up the edges. I did my initail shaping by bending the metal around my back, then bending it a little more over the anvil until I had sort of the right shape... but it was very flat and didn't seem to fit right so I felt armound on my back and thought things like "hmmm.. there's more muscle over the sides of my back and sort of a trough down the middle but the trough can't go down to far or the bottom of this thing'll dig into my back... and it needs to be bent in at the top...". So I dished sort of a light trough down most of the center of the backplate then dished it out on each side of the trough a little until it felt like it fit good, and did some other shaping to make it fit better.
Now one of the hard parts, getting the breastplate to fit with the back plate... not sure how to describe this.. it was a lot of pounding and more shaping, trying the pieces together, duct taping them to myself (oh I woulda looked almost right at home on an SCA battle field ...), then more pounding, fitting, etc... got tired of pounding and fitting so I rolled a big fat edge on the top edge of the backplate, then anealed it and went at it with a hammer and dull chissel to try some roping. I only got in three roped lines before noticing that it was getting a little late so I went up stairs and showed Gregory my start at a roped edge and he told me about an artical in one of the Best of the Hammer books. I found it and read it... they use a roping steak.. it's a small steak with the roped grooves cut into it. We don't have on in the shop... I thought about making one, but I think that by the time I get done roping the top of the back plate with what I started using, I'll prolly be good enough at it. After reading the artical I went back down to the shop and messed around with more fitting for a couple more minutes then closed down the shop for the night (putting tools back, draining the gas lines and stuff on the welding tanks, turning lights off, etc...). I'll prolly be back working in the shop several more days this week, I'm on spring break :)
~~~~~~~~~~~~~~~~~~~~~
Early 16th century armor
~Day 3~
4th of April
6pm to 12:00 midnight
I spent about six hours in the shop tonight, but prolly only two or three of them were spent working on armor. The rest of the time was spent working on a sword blade.. I'll prolly try forging my own pretty soon.. I'm going to start with a long sword or two, then do a shorter blade for a katsbalger, then a dagger. So anyways, I only got to work on armor a little bit. I finished roping the top edge of the backplate and started doing the big fat roll for the roped edge at the top of the breastplate. As mentioned in lastnights update, I'm doing my roping by making a fairly large rolled edge, about 3/8" diameter, then aneal the roll and make the indents with a rounded chissel and a hammer. Once that is done, I go over the roped edge with a file to take off sharp metal bits and take out hammer marks.. then I buff the crap out of it until it looks good. The roped edge on the top of the breastplate will prolly be a little tougher to do cause the metal is 16ga instead of 18ga. I figure that after the breastplate's roping on the top edge is done, I'll have at least six more edges to rope.. those would be the armholes on the backplate, edges of the gussets for the breastplate's armholes, and the bottom edges of the tassets.
~~~~~~~~~~~~~~~~~~~~~
Early 16th century armor
~Day 4~
5th of April
6pm to 12:00 midnight
I now have both the top of the breast and back plates roped. My first attempt at roping the other night came out pretty good, but my second try was better. The 16ga of the breastplate was harder to start but it didn't squish down as much and the metal seemed to move more how I wanted it to move. I started this one by finishing the big fat roll I started the other night at the top of the breastplate, then drew on the ropping lines with a marker, went over the lines with a dull chissel and a hammer.. this just scored some lines that didn't look like what I wanted.. so I got out a chissel with a larger, more rounded end, and went over the lines again. That gave me a roughly shaped roped edge (that had less hammer marks than my first try) and I did my final shaping with a square file. I also did some more work on cleaning up the center weld on the breastplate. This was done with "the big belt sander" and a 220 grit belt. The last thing I did tonight was start on the gussets (the articulated plates around the armholes of the breastplate). Making the pattern for these was really simple.. just held some thick paper up to the armholes and traced the line of the armhole, then drew a parallel curved line an inch to the inside of that line and a similar line on the other side of the center line (with enough space for a roped edge roll). Shaping these plates took a lot more time than I thought they would.. it was all bending by hand because I used 18ga but getting just the right shape to fit the armholes of the breastplate was tricky.. but I finaly got them right and decided to call it good for the night cause it was getting late. Master Gregory came down (down cause the shop is in his basement) into the shop while I was shaping the gussets and said something about getting a good gambeson because those will give nice armor bites. During my walk home I did some thinking about this and I think I'm going to punch holes along most of the inside edge of the gussets and sew some padded quilted material to them that would get between me and the parts that bite.
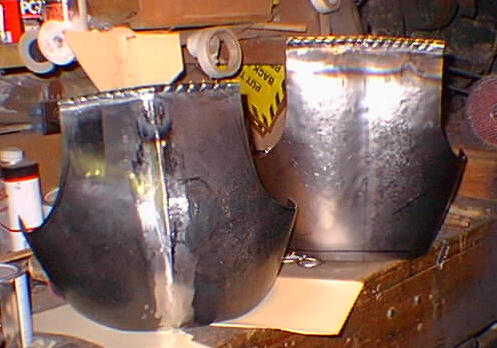
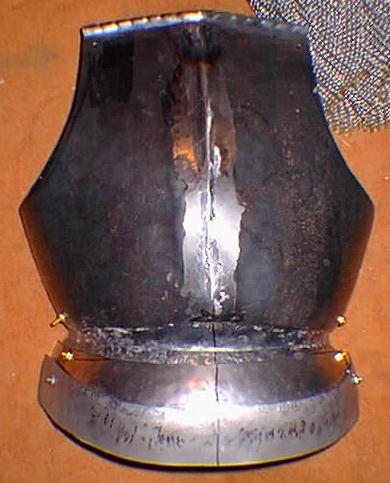
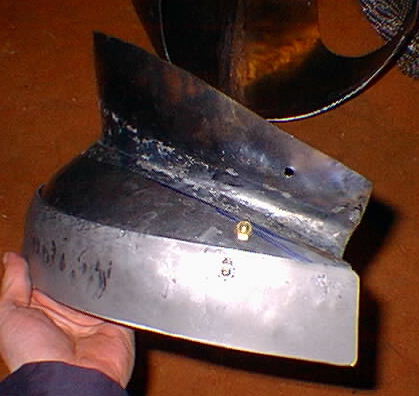
Picture
of the breastplate and backplate sitting on a workbench. I need to do a little more shaping to both.
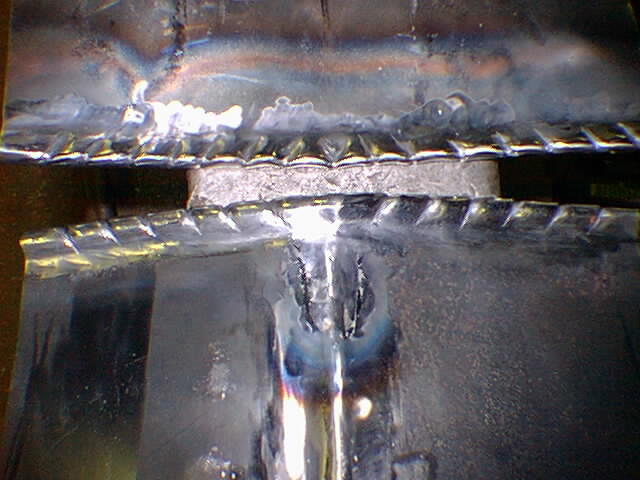
Picture
of the roped edges at the top of the breastplate and backplate. Again, the backplate (on top) is 18 gauge and was my first try at roping.. and the breastplate (bottom in picture) is 16 gauge and was my second try at roping.
~~~~~~~~~~~~~~~~~~~~~
Early 16th century armor
~Day 5~
6th of April, 2001
4pm to 12:00 midnight
I finished shaping the gussets tonight and and drilled the rivet holes for them. They are currently held on by bolts. I'm not sure if I like them.. the lower rivet on the first one I did is slotted on the inside but I made the slot before flaring the edge so it does not move through the slot very much. The other one that's not slotted moves a lot better. I'm not sure if I like the gussets but won't really know if they'll stay on the breastplate until it's to where I can put it on. I also started on the articulated plate at the bottom of the breastplate...
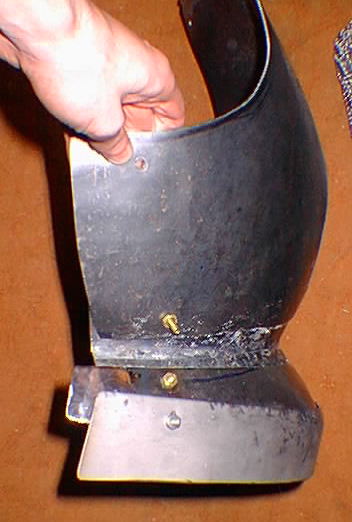
Picture
of the breastplate with gussets and articulated lower plate. I bent the lower articulated plate to shape just enough to figure out where the rivet holes should be, then I drilled the rivet holes in both plates and held it together with bolts while I did more shaping of the articulated plate. I've found (with this lower articulated plate and the gussets) that after the initial shaping is done, more shaping such as rolling or flaring the egdes, is easier if the plate that is being shaped attached to the plate it is being shaped to fit. As I started to say a moment ago, once I was done with my initial shaping, I drilled rivet holes and articulated the parts together with bolts. Then I put a thick layer of duct tape over each side of the articulation and finished shaping.
Picture
of the same thing from the side.
Picture
of the articulated lower plate of the breastplate, this time without the breastplate. It's made from two pieces welded together. The upper piece was bolted through the rivet holes to the breastplate, then I flared the lower edge of the articulated plate. Having it bolted to the breastplate while I was flaring the edge kept it at the proper shape to fit the breastplate. The duct tape that I said I put over each side was to keep it from articulating and also prevented hammer marks. Once I had the edge flared, I made the lower plate and welded it to the outside of the flared edge. I need to do a little more shaping and cleanup before it's done.
~~~~~~~~~~~~~~~~~~~~~
Early 16th century armor
~Day 6~
10th of April, 2001
6pm to 11:00 pm
I'm not sure how I managed to spend five hours working on this armor tonight and only get one plate of the fauld mostly done. Faulds are screwy.. and a pain in the ass. At least the first couple plates seem to be. Guess thats all I have to say about tonights progress.
~~~~~~~~~~~~~~~~~~~~~
Early 16th century armor
~Day 7~
16th of April, 2001
7pm to 11:30 pm
I now have another plate of the fauld mostly shaped and articulated by bolts. I'm finding that each plate of the fauld needs slightly less curvature than the one above it; and that the plates are easier to fit together if they are just roughly shaped enough to figure out where the holes need to be, articulate them together with bolts, duct tape and clamp them into the desired position and hammer them to fit... also helps if the plate being fitted to another plate is anealed. I'm not entirely happy with the side profile of my fauld so far, I think it should be flatter in the front.. it's too curved.. I think I just need to beat on it for a couple more hours. It looks like I have room enough for one more fauld plate until it separates into the tassets and cod piece.
Picture, from the front,
of the breast plate with tonights and the last nights work on the fauld.
Picture
of the same but from the side.
Picture
of the same thing again, but without the breastplate, and from a different angle.
~~~~~~~~~~~~~~~~~~~~~
Early 16th century armor
~Day 8~
27th of April, 2001
6pm to 11:00 pm
Did a little bit of reshaping and planishing of the fauld parts that I already had shaped, cleaned up most of the weld on the first lame at the bottom of the breastplate, and made three more lames for the fauld. These three went pretty quick, only the first one of the night needed a little dishing to fit the plate above it. I also learned a really easy way to do the rivit holes... I used three clamps (one in the middle and one at each end) to hold the lame to the one it was going to be articulated to.. just make sure they are clamped together really tight, I used a center punch to mark the place for the hole, then drilled through both plates with a drill press. After trying on the breastplate a couple times after this nights work, I decided that I have one too many lames in the fauld.. so the last lame I made is going to be cut in half and modified to be the first two lames of the tassets. I'm looking forward to making the big round codpiece... I think I'm going to do it sort of like a miniature chapel de fer.. don't want anything too big and obscene because I do a lot of demos for schools and stuff, and when it comes to the questions and answers part of the demo, I don't really feel like explaining something like big onscene cod pieces to a second grader... oh well, it fealt good to get more than one lame done tonight.. fealt like I made some good progress :)
I've been trying to add new in progress pics everytime I work on this, but sometimes what I get done is pretty much the same as I got done the last time I worked on it.. so from now on I'll prolly only post pictures when I have made definate progress from the last time I worked on it. Takes up less server space too...
~~~~~~~~~~~~~~~~~~~~~
Early 16th century armor
~Day 9~
?th of May, 2001
6pm to 12:00 midnight
Getting ready to head over to the shop, I found out that if I took the fauld off the breastplate, the fauld and breastplate would fit into my backpack.. but while doing this, I forgot to pack the extra fauld lame that was going to be turned into tasset parts.. so I started the tassets without it. I was wanting to build both of the tassets at the same time but then decided it would be better to get one right then copy it for the other leg (these are the long, multi-lame tassets). I found it was difficult shaping the lames individualy to fit each other and still curve in to fit the legs... my solution so far has been to curve the top tasset lame to fit the bottome of the fauld, then fit the other lames I'm working on to that one, not compensating for the shape of the leg... lay them down so they are overlapping properly, then cover the whole lot of tasset parts in duct tape so I can shape it more like it was one peice of metal.. then I'll trim up the edges, do rolls, and holes/slots for rivets. I haven't done much of it yet but what I have done seems to be working (slightly more than the covering with duct tape part).
~~~~~~~~~~~~~~~~~~~~~
Early 16th century armor
~Day 10~
30th of May, 2001
8pm to midnight
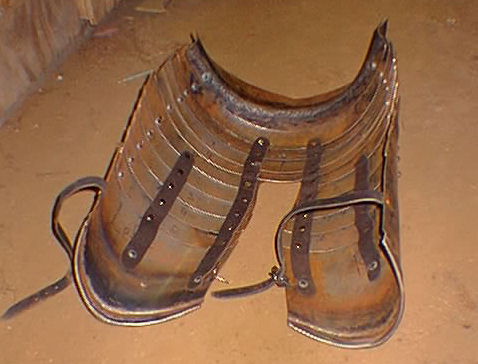
I was going to articulate the tassets all the way down to the knees, but I got a little less than half way there and noticed it was starting to get a little heavy. So I decided to go with five lames and a large plate at the bottom of them. The thing I mentioned about duct taping all the lames together, overlapped in the position they would later be assembled in, and working it like one piece of metal worked really good. I also rolled the edge on the large lower plate (it will be ropped later, once I get the matching one made). I trimmed up the edges of the tasset so all the plates are even.. this was done on a band saw while they were still taped together into one piece. I guess thats all..
~~~~~~~~~~~~~~~~~~~~~
Early 16th century armor
~Day 11~
2nd of June, 2001
6pm to 2am
I started out tonight trying to get some of the tool marks out of the rounded flute at the bottom of one of my tassets... plannishing was not working so I asked Master Gregory if he had any ideas.. he took a look at the tools I was using... a hammer with a > shaped face with the corners rounded off, and small metal steak with a 1/4" wide half circle groove cut across it and he said I had the right idea.. just needed better tools.. ones with more rounded faces where the come into contact with the metal I'm working.. and that I would have to make them... so I made them. I should get some pictures of what I was using and what I'm using now, but the one I'm using now was sort of a practice one that I made out of steel that is already starting to show signs of use.. the next one will be tool steel or something like that... it's just a 1" diameter piece of round steel bar with a 1/4" wide U shaped grove cut into it, and the edges rounded off. I also rounded off the angular parts of the hammer I was using. I went over my rounded flute (hey you pro armourers, not sure what the proper term is for my rounded flute.. I'm not sure if it's a flute or something else, mostly when I think of flute, I think of a shape like an inverted V but the ones I'm doing, is more like U. is it still a flute?) with my new tools and although many of the old tool marks are still there, it does look a lot better and I think a little light grinding with the medium grit abrasive wheel will take care of most of it... but I got a little bored with messing around with the fluting so I cleaned up and polished the fauld, then at about midnight, went upstairs and looked at armor books for a couple hours... trying to decide what I want to do for holding the fauld to the bottom plate of the breastplate, if I want to have the long tassets removable from the fauld, and other stuff like that. I also realized that my tassets need to be a little less long.. I'll prolly just trim down the top of the bottom plate (would trim down the bottom of the bottom plate but I already rolled the edge and put in that pesky flute right next to the rolled edge).. or I could take out one of the lames. I think trimming the bottom plate would be the easiest.
~~~~~~~~~~~~~~~~~~~~~
Early 16th century armor
~Day 12~
6th of June, 2001
6pm to 12:30am
The left tasset is almost done and looking really good. I trimmed down the top of the lower tasset plate so it was more the right length, evened up the edges, drilled all the holes, and filed the proper holes into slots. The slotted holes are the ones on the outside edge of the leg near the lower edge of each lame. I also finished cleaning up the rolled area on the bottom tasset plate and gave all the plates of the tasset a nice mirror polish. There isn't much left to do before the left tasset is done... another night of work should do it. All I have left to do is put in the sliding rivits on the outside line, rivit in the leather that articulate the inside and center line, and put in the dummy rivits in the areas with leather articulation. Dummy rivits are the ones that don't hold anything together... just for decoration to make it look like steel on steel articulations instead of steel on leather articulation... sounds kinda silly but thats what they did. I think I'm going to articulate the tassets directly to the fauld once I get both of them done.
~~~~~~~~~~~~~~~~~~~~~
Early 16th century armor
~Day 13~
7th of June, 2001
8pm to 1:00am
I made and installed the fake rivits. Making them just means I took normal mushroom headed rivits and ground the shaft down to about 1/8" long so the peened over side doesn't really stick out to interfere with the rivits holding in the leather straps. I also started on the other tasset.. got all the plates cut out, shaped (they still need a little more fitting though), rolled and did the decorative stuff to the bottom of the large plate and got that part cleansed of tool marks... ready to start drilling holes for the slotted articulation along the outside line.
~~~~~~~~~~~~~~~~~~~~~
Early 16th century armor
~Day 14~
8th of June, 2001
5:30pm to 12:30am
Both of the tassets and fauld are now ready to be articulated on sliding rivits and leather straps. Before heading over to the shop today I decided to dig around my house and find my immitation whitney metal punch.. I had been using a drill press to make holes in stuff but it almost always left sharp burrs so I decided to see if the hand punch might speed things up cause I wouldn't have to deburr the holes... but getting the thing to punch through 16ga takes a lot more time... and then Gregory saw what I was doing and said something like "hey, stick the punch in a vice and stick a piece of pipe over the handle for a longer lever"... so I did that.. and after sticking it in the vice a few times, I found that clamping the top handle in the vice would keep it very stable (other ways I tried would not hold it when I tried to punch stuff). Then I went outside and got the long handle off the beverly shear to use for a handle extension on the punch. Using it this way took almost no effort on my part.. prolly just a couple pounds to push the lever down. Next time I'm at the shop I'll get a pic of how I had it stuck in the vice.
~~~~~~~~~~~~~~~~~~~~~
Early 16th century armor
~Day 15~
11th of June, 2001
4:00pm to 1:00am
I decided to add a slightly decorative edge to the lames of the tassets and fauld... nothing too fancy, just a little something to break up all the strait lines that were in there... so I ground some sort of \/ things (more rounded than that, sort of like a scalloped edge but not as many scalloped things)into the edge of the lames. There are five of them on the fauld and two on each tasset. For more on how I do this, take a look at the page about how I made my gauntlet and find the part about decorative edges. After I had put the decorative edge on the first tasset I took a two hour break (from 7 to 9pm) to go to live steel practice. Came back to the shop and finished adding the decorative edge to the other tasset and the fauld. Then I went up to the leather shop (metal shop is in the basement, leather shop is on the third floor, in the attic) and started articulating the plates to strips of leather. This part is fun because it feels like I am getting close to having a big part of this armor done, and I get to sit down and work.. in the metal shop I stand up most of the time. trying now to think of ideas for secure ways to secure the fauld to the breastplate and have it be removable... without using straps and buckles. I have this sort of hook and eye latch thing in mind that will also have a spring pin to keep the latch closed while I'm running around.
~~~~~~~~~~~~~~~~~~~~~
Early 16th century armor
~Day 16~
12th of June, 2001
6:00pm to 12:30am
The fauld and tassets are now very very close to being done.. only thing I have left to do make and install the turning key-post things that will hold the top of the fauld to the bottom of the breastplate. I decided not to do the hook and eye latch with a spring pin to keep it closed... too complicated and I haven't seen any armours of the early 1500's that have that sort of arrangement to hold the fauld on. I also did a little more work on the backplate... trimmed up the bottom edge just a little and started recessing the edges of the armholes to look sort of like it has articulated gussets like I did for the breastplate.
~~~~~~~~~~~~~~~~~~~~~
Early 16th century armor
~Day 17~
15th of June, 2001
9:00pm to 2:30am
Tonight I made the little turning hook shaped rivets that go on the bottom articulation of the breastplate to attach the fauld to. To make them, I started out with a 5/16" round steel rod; heated it up (with the welding torch) and used a vice to bend about the last half inch to a 90 degree angle. Then I heated it again and used a cross pien hammer to draw the bent end out a little so it was tapered, and pounded on it a few more times to get it to a better 90 degree angle. Next step was to use the big band saw to cut the section off that I wanted, about an inch to 3/4 of an inch from the bend. Then I took it to the belt sander for more shaping and finished up with a lot of shaping with small files. Each one took a little more than two hours to make but now that I've made a couple, making more might not take so long... and it's a good thing too.. because I screwed up when I was riveting them to the breastplate. I started with the second one (which I did not like as much as the first one... not as shapely) and it went on fine, though the shaft was a little long. Then I did the second one (which was the one I liked, the one with better shaping), it also went on fine and had a slightly shorter shaft which worked a lot better.. it was fit in there perfect, not to tight so I couldn't turn it and not so loose that it would rattle around and turn it's self... then I noticed I had riveted it into the wrong hole... damn it I feel stupid. I might be able to salvage it somehow, maybe grind the piened end out and weld on a new shaft, or maybe I'll just have to make another and hope it comes out better than the other one. yeah, I'm pissed off and I feel real dumn cause of it, but it's really kinda funny for some reason... I even remember checking to see if it was going in the right hole; and while piening over the shaft, I noticed it somehow fealt a little different but I thought nothing of it at the time... and even tried turning it a few times before I noticed the mistake.
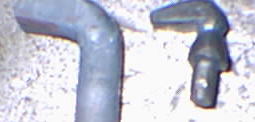
picture of a finished turning pin and one that has just been started.. it's been heated up, bent, and a little hot shaping with a hammer.
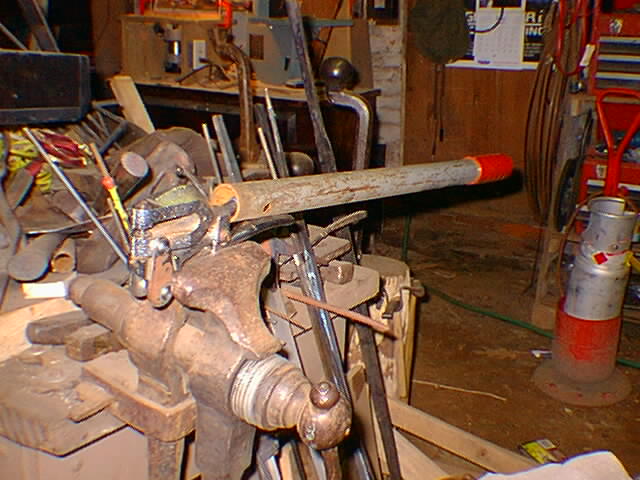
picture of the way I have the metal hand punch set up in a leg-vise, with the handle off the beverly shear as an extention for the punch's handle... this thing was mentioned a couple posts up.
picture ...this is what we call a stupid apprentice trick.
~~~~~~~~~~~~~~~~~~~~~
Early 16th century armor
~Day 18~
16th of June, 2001
7:00pm to 1:00am
I started off tonight by fixing my stupid apprentice trick from the night before.. ground out the rivet and built up a new rivet shaft with blobs of weld, then filed the newly built shaft to 1/16" diameter and riveted into the correct hole. Next, I filed out the "key hole" (more of an oblong egg shape) holes in the tassets that the turning pins go through... and now the fauld and tassets are DONE. yay.
I decided it was time to go back to the breastplate and work on that a bit... I might have mentioned earlier that the top edge of the breastplate, the one that I spent hours rolling and roping, was to high up on the gorget... so I cut the roped edge off, then cut a little over an inch off the top of the breastplate, and welded the roped edge back on.. once the weld was cleaned up, the roped edge somehow looked nicer than it did before I cut it off.
Because of the amount I cut off the top of the breastplate, the gussets were too long so I trimmed them down to match the breastplate again, and punched new holes in both because the old set of top holes was on the part that got cut off. I finished rolling the edge of one of the gussets. On one of the gussets, I tried to make a slot for a sliding rivit in the bottom hole, but it bound up and never worked good, so I filled in the slot with weld and got the weld cleaned and smoothed up. I realized that If there was going to be a sliding rivet on the gussets (to give more freedom of movement to the arms with the gussets in place), that the slot would be from the top hole in the gusset... so I put a bolt through the bottom hole and held the top hole of the gusset over the top hole of the breastplate, then let the gusset pivot down while I had a sharpie marker in the hole of the breastplate.. this traced out a line on the gusset that showed exactly where to put the slot. The slot came out perfect and I'm thinking about making one the same way for the lower hole of the gussets, but I'm not sure yet if that would be a good idea... gotta give it a little more thought.
picture of the inside of the gusset, articulated to the breastplate by bolts. On the right side of the picture, if you look close, you can see where I filled in the old slot with weld and did not clean it up much cause it's on the inside and no one will see that while I'm wearing it... it looks much better from the outside. On the left is the new slot.
picture of one of the turning pins that holds the fauld to the bottom part of the breastplate. something to take note of... the hole that the pin goes through has the narrower part of the "keyhole" pointing towards the center of the breastplate, and once inplace, the pin is turned to face the opposite direction. If it was the other way around.. with the narrow part of the keyhole pointing out to the side, it would make it easier to mount and dismount the fauld from the breastplate, but it would put a lot more stress on the pin and keyhole and they might chew through each other.
picture of the completed fauld and tassets mounted to the bottom articulation of the breastplate. It's not some illusion or trick played by the light... yes, one of the bottom plates of the tassets is about an inch longer than the others... didn't notice it until it was all put together. if I was getting paid to do this for someone else, I would have pulled it apart and fixed it, but since it's mine, it can stay like that.
picture ...detail of the bottom edge of the tasset.. the edge is rolled, then I put sort of a rounded flute along next to the roll.
picture of the inside of the fauld and tassets (still mounted to the bottom part of the breastplate). Hmmm.. this might not be entirely done yet... Looking at this picture, I remembered that I was going to make some metal tips for the straps. I might not do that though cause they'd just clank around and make lots of noise.
~~~~~~~~~~~~~~~~~~~~~
Early 16th century armor
~Day 19~
17th of June, 2001
6:00pm to 1:00am
Tonight I finished off the gussets (still need to be riveted in place and have the soulder straps attached, but all the shaping and polishing is done), got the breastplate mostly done, and worked some more on the back plate.
I used a small tub of muriatic (might have spelled that wrong) acid to take the mill scale off the breastplate... it made big billowing clouds of white stuff (Clorine gas, I think) so I had to do it out side and wear a big respirator and other safety stuff like thick rubber gloves and a face shield. It was fun watching the mill scale get eaten away... like watching paint dry. Then I cleaned up and nuetralized all the acid covered stuff. I think the nuetralizing stuff was baking soda and water? maybe... next, I took the breastplate in and went over it with a 400 grit belt on the big belt sander, then buffed and gave it a nice coating of paste wax.
On the breastplate, I continued puting in the sunken edges around the armholes for the fake gussets. I did this by taking a block of wood and cutting a 1"x1/4" section out of one corner, then used the 1/4" deep L shape that was created by the cut out to hammer the metal into, forming a slight shelf, or recessed edge around the armholes. I still have to clean this up... right now they are looking a little lumpy. I also started to roll the edge of one of the armholes. Oh, and I punched holes in the backplate for the two shoulder straps.
Now I'm trying to decide... steel or leather shoulder straps.. I've seen both on this style of armor. I might go with leather with steel riveted onto it in places.
~~~~~~~~~~~~~~~~~~~~~
Early 16th century armor
~Day 20~
25th of June, 2001
9:00pm to 1:00am
I didn't work long tonight because I went over to the shop after live steel practice got done at nine. I Finished rolling the edges of the backplate's fake gussets and then started on the flared lame on the bottom of the backplate (simmilar to the one I did for the bottom of the breastplate). I got the upper plate of that shaped, then went back to the finish up the breastplate... yeah, I've noticed that on large projects like this, I jump around a lot.. that way of I get tired of working on something, I have another part of the project that's already started and waiting to be worked on some more.
All I had left to do on the breastplate was to put the decorative edge on the bottom (a few minutes in front of the belt sander, and a couple more minutes with a file), then rivet it to the lower part of the breastplate, and rivet in the gussets. The slotted rivets on the gussets seem to work really good so far.. just have to put the buckles on them. Only thing left to do on the breastplate is put the buckles on, and add whatever other fittings it needs to attach to the backplate. I'm kind of hoping to have everything but the arm harnesses done for a demo this weekend so I'll prolly be in the shop a lot this week.
~~~~~~~~~~~~~~~~~~~~~
Early 16th century armor
~Day 21~
26th of June, 2001
7:00pm to 12:30am
Breastplate and backplate are now done. I finished the lower lame of the backplate and riveted it on.. it's two pieces welded together in a similar way to the one on the bottom of the breastplate. All the straps and buckles are done, including a thin belt that goes around the waist of the armor to hold the front and back plates together. The armor is a little loose around the waist so I might trim down the backplate just a bit, but I'll use it a few times and see how it works out. Master Gregory gave me a gambeson that was too small for him... a lot of his old garb fits me but I'm not sure if this gambeson was his, or if it came from somewhere else. I think it's a little earlier period than this armor, but it fits me and works well with it. The sleeves have arming points at the elbows and fore arms (the ones at the fore arms might just be to tighten up the sleeves though), and the sleeves tie onto the body part of the gambeson. I'm thinking about doing a pair of puff and slash sleeves that can also be used with this gambeson. So, the armor is now fully wearable accept for the non existant arm harnesses and cod piece. I'm starting on the cod piece tommorow.
~~~~~~~~~~~~~~~~~~~~~
Early 16th century armor
~Day 22~
27th of June, 2001
8:00pm to 1:30am
The cod piece is now done. This was a fun project, which for some reason, since I started this armor, I have been looking forward to doing. The bulged part of it was made just like the top of a two piece helmet top... cut out two sort of lemon shaped pieces, dished them, and welded them together, then did a little more shaping to get a sort of upsidedown tear drop shape.
Next, I traced it out and made a brim for it, then welded that in place and cleaned up all the welds, polished, drilled a hole, and it was done. It came out a little smaller than I would have liked, but the hole I had left between the tassets was a little small to begin with... and because I do a lot of demos for schools (a lot of 1st through third graders), I didn't want a cod piece that was as large and obscene as many of the period ones were on this kind of armor.
Of course, when I was talking to Gregory about it he said, in response to whatever questions the kids might have about his eight inch long phalic cod piece "what's this thing? it's an advertisement... and where I keep my water bottle" *then he'd pull a rubber hose out of the end of it and take a drink*... could keep a sandwich in it too, and some hotdogs... and the conversations went down hill from there.
anyways, the cod piece is currently held in by a nut and bolt, and I'll prolly leave it that way until after the demo this weekend. I left the shop, wearing my armor, at about 3:00am and walked the 30-45 minute walk home... I think I need to add one more set of holes to the shoulder straps, and a little more padding into the hip area of the gambeson... no complaints on weight, it was fairly light and easy to move in. It makes a nice rhythm of clanking noises that reminds me of something by Laibach... sounded cool echoing off the buildings in downtown.
~~~~~~~~~~~~~~~~~~~~~
Early 16th century armor
~Day 23~
4th of July, 2001
8:00pm? to 1:00am
Yes, tonight I was in the shop working on armor instead of watching things blow up in the sky and make pretty little lights fly through the air. But I could still hear it... when I wasn't pounding on metal, or wasn't running the bandsaw or belt sander.
First on tonights list of things to do was a little bit of work on the straps that hold the breastplate and backplate together... I punched two more pairs of holes in the shoulder straps, and cut the ends of the straps of cause there was no way I'd ever need most of the holes, and the long straps got in the way of the breastplate's gussets. I also made another hole in the waist belt strap. Sometime, I might make some metal tips for the straps, but maybe not... just another something to clang around when I move.
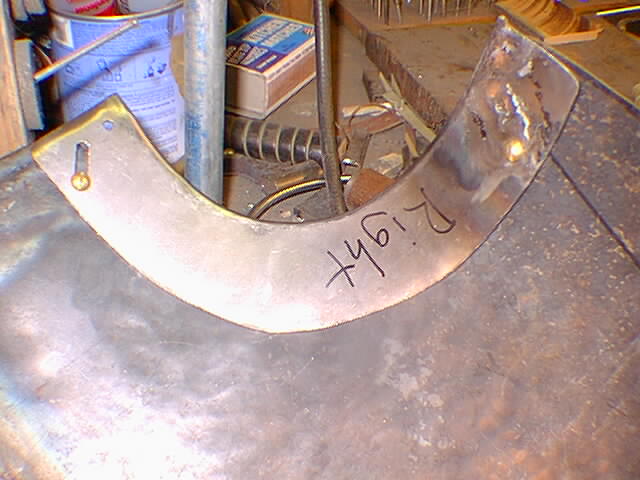
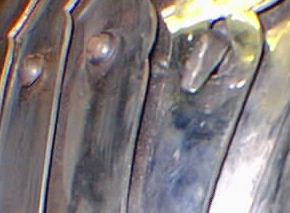
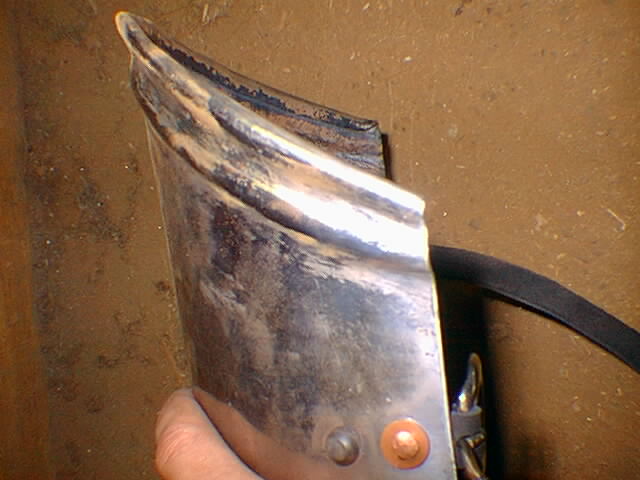
I started on the arm harnesses... starting at the shoulders and working down. I have a good start on the pauldrons/spaulders/shoulders. I'm not sure if I'll keep the ones I'm working on now... it'll depend on how I like the design. I'm using one large-ish cop for the shoulder joint, two lames below that, and a larger plate below that(reaching almost to the elbow). There were two other designs I was thinking of using. One was a very large cop for the shoulder (like the one I'm making, but with the two lames being a solid part of the cop), and a series of lames below the cop (an example can be seen in one of the woodcuts linked to the top of this page), but I decided the largeness of the cop would restrict movement, and Gregory agreed when I described the idea to him. The other design is the kind I have seen most often with this type of armor... a dished out rectangle (placed horizontaly) over the shoulder joint, with a sort of football shaped lame articulated to the top of that, and several lames below the dished rectangle.
So far, I have the shoulder cops dished and plannished, all the lames cut out, and two of the lames for one arm are roughly shaped. I might have to do more dishing on the shoulder cops.
~~~~~~~~~~~~~~~~~~~~~
Early 16th century armor
~Day 24~
5th of July, 2001
8:00pm? to 1:00?am
The spaulder for the right shoulder is almost done. Just need to put the straps and buckle on it; and decide how I want it to attach to the gorget (strap/buckle, or some kind of spring-pin/hole, or turning-pin/keyhole), then make and install whatever parts I need to hold it to the gorget. Also have to make the holes for lacing it to a couter style elbow cop, and to the forearm splint... but I'll wait until I have those parts to put the holes in. I also still have to make the Besagues (those little round plates that hang from the spaulders and sit in front of the armpits on some armor), if I decide I want them on the suit. I articulated the spaulder with slotted rivets on the back, and a vertical leather strap on the inside, placed about 2/3rd's towards the fronth. It's a little floppy, and I was thinking about adding another leather strap along the front edge, but for now I'll prolly leave it as it is and see how it works. I have a row of fake/decorative rivets down the front edge, but they are mostly there to fill in holes that I made while building the piece... I did holes along the front and back side so I could do my rough shaping, then bolt the pieces together, and then bend/taper the pauldron to fit my arm better as one piece.
~~~~~~~~~~~~~~~~~~~~~
Early 16th century armor
~Day 25~
6th of July, 2001
8:00pm? to 12:30am
The spaulder/pauldron for the left shoulder is now done to the same extent that the one for the right shoulder is done.. currently, as I sit here in front of the computer typing this, I am also trying to find more pics of couter style elbow cops, and doing a few sketches to get a better feel for how the shapes go together.
~~~~~~~~~~~~~~~~~~~~~
Early 16th century armor
~Day 26~
10th of July, 2001
7:30pm to 2:30am
The first hour spent in the shop tonight was used to do some repairs on the katzbalger I use with the armor.. the weld holding the tang to the blade broke, but it was still holding together because of how the two were welded together (the blade had a slot cut out of the base and the tang was welded into the slot, then the welds ground smooth; this made it so that when the sword was put together, the about 3/8" of the tang was above the hilt, and a little over an inch of the blade extended down into the crossguard and handle.. a good way of doing it, but the welds broke because they did not have enough penetration after being ground flush to the blade)... still holding together, but a good thing to fix anyways... Gregory told me how to fix the weld withough ruining the blade.. mostly just need something to suck up the heat from the blade so it doesn't get to hot and ruin the temper.. sandwiching the blade between a couple steel blocks worked for that part of it.. the other thing was to not let the metal to get hot enough for it to start sparking, but still get good penetration in the weld. That was the part I had trouble with. There's a very thin line between a nice little pool of flowing metal, and a pool of metal with sparks flying off it. I'm not sure if I fixed it anybetter than it was before, or if I made it worse. I took it up to show Gregory and we both agreed that it was some really ugly welding (partly because I wasn't used to that sort of welding... I've mostly done welding on sheet metal with the micro torch, not 3/16" thick chunks of metal with a medium sized torch... need more practice). Gregory said he'd be back down to the shop later to see if the weld I had done would hold up.
He never did come back down to the shop that night, but that's okay cause I my armor to work on...
I'm still trying to decide exactly how I want to attach the pauldrons to the gorget.. so while I'm undecided on that, I started on the couters (a style of elbow cop that was usually tied to arming points on a gambeson or arming doublet). The woodcuts linked to the top of this page show a style of couter similar, in some ways, to what I am making. Another picture, a modern recreation by armourer Robert Valentine, can be seen at
Valentine Armouries... once at his website, go to the historical armour link, then the Landsknecht link. One of the harnesses on that page has couters that might be closer (in some ways)to what I am making than the ones in the woodcuts.
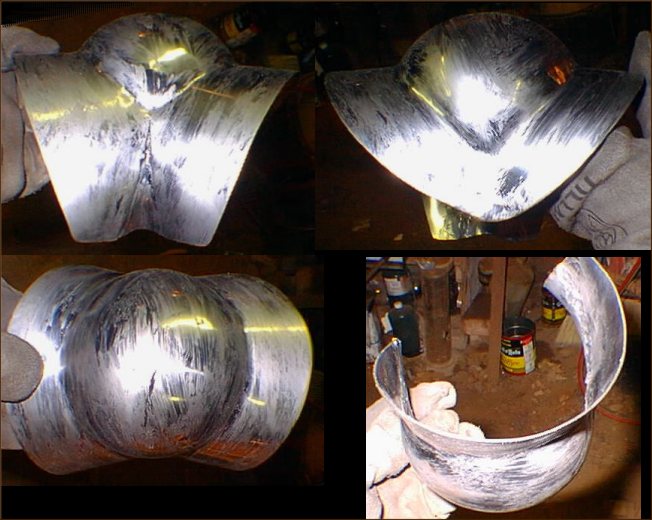
anyways, I decided to do them in two pieces; a deeply dished plate for the elbow, and another plate for the wide brim sort of thing around the edge of the cop. As things went together, my two piece pattern turned into a four piece pattern. I cut out and dished the elbow cop, then cut out and roughly shaped the brim.. I did a couple tack welds to hold the brim to the cop, and decided that it would be easier of the brim was in two pieces, so I use some metal snips to cut it into two pieces while it was still tack welded in place. Having the brim in two pieces made it a lot easier to finish the shaping and after I was done with the shaping, I welded the brim in place. My welds on sheet metal seem to be getting a lot smoother.
As I was welding the brim to the cop, I noticed a flaw in my pattern... towards the inside of the elbow, on the top side of the couter, there is supposed to be a sort of extension that comes up and around the inside of the elbow joint a little; and as it comes up and around, it's supposed to have sort of a V shape (with the V pointing in towards the arm)... it had all that, but the plates did not come together... there was a big wedge shape that had to be filled in. I thought of a couple ways to fix it, but I liked Gregory's suggestion the most... he suggested welding a wedge shaped piece of metal into it from the inside; and with the lines of the couter, it might even look like it was done as a decorative thing. So I tried it, and it worked great... welded it in, and with a little pounding, got the inside line into the V shape that it's supposed to have... only shaping I have left to do is to roll the edge of the brim and maybe rope it.. then all I'll need to do drill a couple holes, clean up the welds, polish, and strap... then make the other one. I also started on the besagues, but only got them traced out onto metal before I realized it was 2:00am... and the bandsaw is one floor below, and directly under Gregory's bed (he'd prolly still sleep through it).. I went back to doing quiet stuff like welding. For a besague pattern, I used the bottom of a coffee can. It seemed to be just the right size, and I remembered someone (maybe it was Gundo) on the Armour Archive mentioning using coffee can lids or bottoms to trace out besagues.
...and it's back to the shop again tomorrow.. on monday, I found out I'm doing another demo (at the Bangor Public Library) in a couple weeks. It would be good to have my arm harnesses done for that.
~~~~~~~~~~~~~~~~~~~~~
Early 16th century armor
~Day 27~
11th of July, 2001
7:30pm to 1:30am
One of the couters is now done and I have a pretty good start on the other. Most of tonight's time was taken up with using a hand grinder and medium abrasive wheel to smooth out welds in one couter... then I cut out the cop for the other couter; dished, planished, and polished it.. and cut out the two rim pieces. I also got a few pictures of my couter in progress and the one that's almost ready to be strapped (just needs holes).
Pictures
of the mostly finished couter from different angles, all edited into one pic.. the streaky look that the metal has is just the massive amounts of paste wax I put on it to protect it from the humidity, not ugly grinding marks.
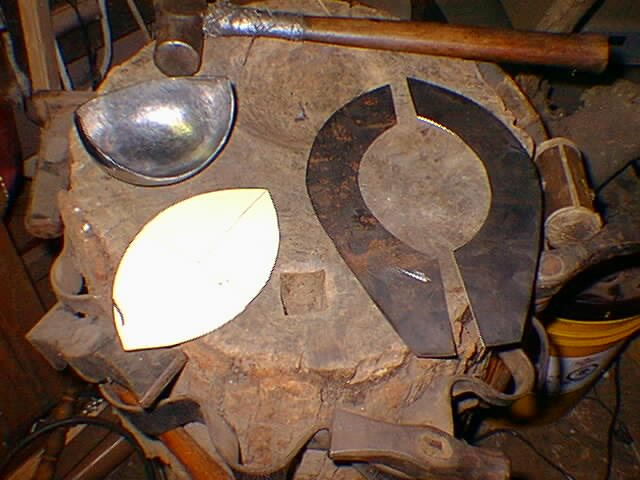
Picture
that sort of shows the pattern I am using. The dished piece of metal is the cop, the lemon shaped paper next to it was the pattern it was made from. The two other pieces of metal on the right are the rim plates... when I first made the pattern I had them as one plate.. but once I had it bent roughly to shape and tack welded to the cop, I found that it would be much easier to do them as two plates. The little square hole towards the front of the picture was made to hold stakes, but I found that the hole was also very useful for doing deep dishes like on the cops... I do my initial dishing in the large dishing hole or the cut off bottom of an oxygen tank (using the 5+ pound ball stake that fits in the stake-hole).. then I use the little hole and a large-ish ball peen hammer to dish it deeper. I find that the small hole gives me better control over the dishing, and the sides of the metal do not warp. To do the deep dish, I start by hammering around the edges, about a centemeter in from the edge... this sort of turns the edges up about 30 degrees.. then I do another pass around the cop, this time just a little closer to the center than before. Now the cop will look moslty flat, with upturned edges (looking from the inside).. I keep doing the same thing, each pass around moving closer to the middle. Once I reach the center, I start over again... and keep repeating until I have a nice deep dish. I also find it useful, at least for the first few passes around, to have lines drawn in to show where I am supposed to be hammering.. but after a few passes (or lots of practice) it should be easy to see where it needs to be dished.
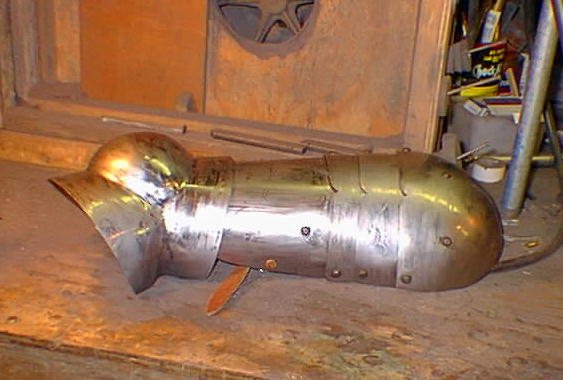
Picture
that shows the mostly complete couter with the mostly complete pauldron. The couter just happened to fit with the pauldron without any refitting or bending of either piece. Going to be a fine looking pair of splints when I'm done. Again, the streakyness on the metal is all the paste wax I gooped on to keep it from rusting while I'm not in the shop (and from rusting while I am in the shop).. it seems to buff off to a nice shine again while leaving a thin layer of wax on the metal... but not until it's out of the shop. Stuff rusts up overnight in there.
~~~~~~~~~~~~~~~~~~~~~
Early 16th century armor
~Day 28~
17th of July, 2001
7:30pm to 2:00am
Both couters are now mostly done, they just need strapping... and the pauldrons now attach to the mantle of my padded coif by a pair of points (laces that come off the coif and go through a hole near the top edge of the pauldron). There seems to be the slight problem of the pauldrons moving to far back on my shoulders if I move my arms a certain way... I'm thinking that the addition of bessagues (those funny little rondels that hang in front of the armpits on some armor) might fix this problem. If that does not help, then I'll point part of the bessagues to the padded coif as well... the points will pass through the leather that suspends the bessagues from the pauldrons, and will be hidden under the edge of the bessagues... but I might not need to do any of that.. I'll have to wear it around for a while to tell if it really needs extra points.
~~~~~~~~~~~~~~~~~~~~~
Early 16th century armor
~Day 29~
26th of August, 2001
5:30pm to 11:30pm
Sometime between tonight and the last time I updated, there was a night that I worked on this armor and didn't bother to post what I did... it was a while ago.. I think all I did was add the straps to the coiters, repair one of the fingers on my right hand gauntlet, and some buffing.
I've had some time to try out my method of pointing the pauldrons to the mantle of the coif and decided I did not like it. The pauldrons flop around to much and just don't feel right... So I decided that tonight I would solve the problem by tackling the "post & hole" method of attaching pauldrons to the edge of the gorget.. this method seems to have been common in the 15th and 16th century, at least on some German armor... most period examples I have seen pictures of consist of two (one for each pauldron) small hinged tabs on the gorget. On each of these tabs is a post about an inch long.. in some pictures, there is a small spring loaded flange built into the post to that when the post is placed through a hole in the pauldron, the flange will depress and spring back out once the plate is moved down over it, thus keeping the plate from sliding off the post. In some pictures, the post does not have the spring loaded flange... maybe it came loose or maybe in these cases, they just relied on gravity to keep the post through the pauldron... I don't know. I'll be really surprised if any of that made any sence.
I originaly wanted to use this method to keep the pauldrons in place, but was not sure I wanted something as complicated as the spring loaded flange.. I needed something that could stand up to being hit a few times and not need much for repairs.. so I decided to use points. Disatisfied with points, I decided to do the post and hole thing, and instead of a flange, use a small wire cotter pin through a hole in the post to keep the pauldrons from comming off.. once I got started on the whole thing, I figured out a way that seems fairly sturdy and lets the pauldrons still be removed from the gorget.. The post has a hole drilled through it like I would have done with the cotter pin; and placed through the hole, is a short section of wire bent into sort of a V or U shape. The hole through which the post passes on the pauldron is round, with a narrow slot cut out of opposite sides of it forming sort of a key hole for the post and wire. Pictures will describe how this works better than I can... pictures are below.
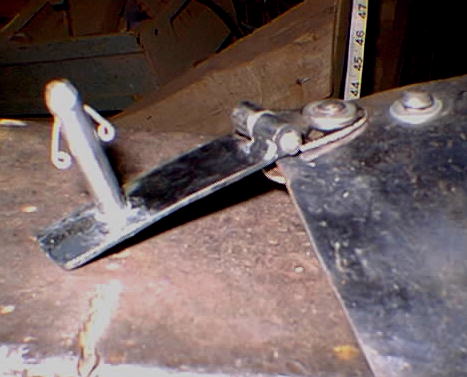
Now, to make the hinge and post... for the actual hinge part, I took a short length, just a little less than an inch long, of 5/16" round stock and drilled a hole (about the size of a nail) through it length wise. that was prolly the hardest part, but a drill press and something with a square edge helps. Once the bar was center drilled, I cut it in half and welded each half to a metal tab.. one tab would be drilled for articulation to the gorget, the other tab would be drilled and have the post welded into the hole.. then a nail was used to hold the two halves of the hinge together.
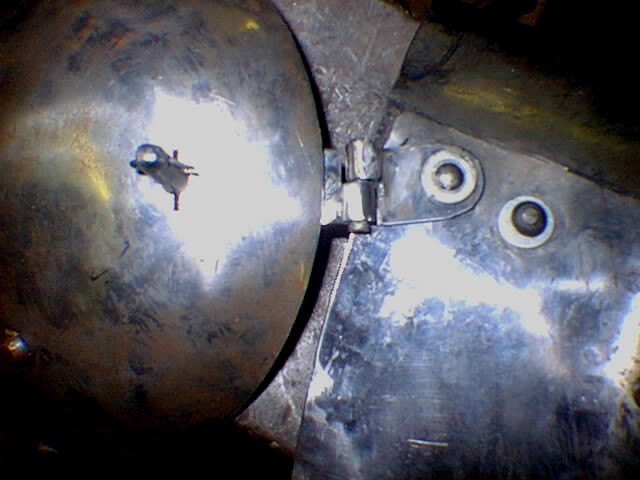
Picture
of the hinge and post.
Picture
of the same thing above, this time with the pauldron in place
Picture
of the same thing again, thise time from above to show the slots cut from the hole in the pauldron. To remove the pauldron from the post, the the pauldron has to be turned 90 degrees (which can not be done while it strapped to the arm) and lifted off when the wire on the post and the slots in the pauldron line up.
~~~~~~~~~~~~~~~~~~~~~
Early 16th century armor
~Day 30~
31st of August, 2001
5:00pm to 11:00pm
Both of the arming posts for the pauldrons are now done. I also made and strapped a pair of besagues fluted and shaped to a rosette design. The strap that hold them on is just a leather strap from the center of the besague to the pauldron's arming post. The strap has a hole in the end of it so it can slip over the arming post, sandwiched between the mount of the arming post and the pauldron.
I might make a new pair of pauldrons... the ones I am using now still seem to slide forward on the shoulders to what seems like their natural resting place. Also, if I lift my arms higher than shoulder height, the top plate of the pauldron lifts and eats the besague when I lower me arms... seems that for wearing besagues, I do need that extra articulation on the top edge of the pauldron. If I make another pair, there might also be a small wing at the back, which might help keep it from sliding forward... or just make them larger than I initially thought they should be.
~~~~~~~~~~~~~~~~~~~~~
Early 16th century armor
~Day ??~
21st of December, 2002
It's been a while since I've updated this page, but I haven't been doing a whole lot of work on the parts of this armor mentioned here. I've mostly been working on the legs. There are however, a few changes to some parts of the armor.
the pauldrons have changed a bit. the tabs that hold them to the gorget are shorter and I pulled out the little V shaped wire at the top of the pegs and replaced them with small coterpins made from wire. The straps that hold on the beseagues are now riveted to the inside of the pauldrons instead of hanging from the posts, sandwiched between the pauldrons and tabs. It's amazing, the besegues no longer get swallowed up by the pauldrons and spit out on my back!
This last spring I was able to make it down to the Higgins Armourie Museum in Worchester, Mass. For the first time, I was able to look in person at historical armor. This was great because I could move around some of the suits and see parts from different angles than are normaly seen in books, and see parts that I had never before seen pictures of in books... like 16th century backplates! For some reason most books only show armor from a front angle so I had made my backplate with a lot of guesswork. One major thing I found about my backplate (and sort of already knew by the way it rested on my back) was that I had not dished it enough in the top portion. I've fixed that now. I think that's about all I've done to these parts since my last update.
~~~~~~~~~~~~~~~~~
Back to Plate Armouring Journal main page
Pictures of what's done so far
~~~~~~~~~~~~~~~~~