Quiver for Crossbow Bolts


based on and inspired by crossbow quivers used in Germany and Austria in the 14th to 16th centuries.
Finished in September, 2010
Finished in September, 2010
Fast forward four or so years to sometime in 2008... I had stopped thinking about making a quiver because a couple years earlier I had made an otter skin hunting bag which just happened to be deep enough to hold my crossbow bolts - then one weekend I was in the Boston area for a weekend while visiting with my in-laws and we found out about a Western Martial Arts demonstration at the Higgins Armory Museum in Worcester, Massachusetts so my wife and I decided to go to that since she had never been there before and I had only been there once over ten years before... and there one of the first things we wondered across on the ground floor, in a glass case with a crossbow and cranequin, was a quiver for crossbow bolts from Austria dated to the late 15th to early 16th century. We took a few photos (not as many as i remembered, but now I feel a need to go back and check some details), as detailed as we could get through the glass of the display case - I was very happy that it was a walk-around case in the middle of the room, and I sat there for an hour or so taking notes and estimating measurements in my sketchbook (maybe I'll scan and post those too).
Having seen a quiver firsthand (and I'm sure that a few more years of experience with making things helped too) my interest and confidence for this project was renewed. I spent a lot of time with my notes and drawings of the quiver at the Higgins Armory, and working in a sketchbook that was large enough to draw the quiver at full size, started drawing up various ideas of how I might build one of these quivers. I also renewed my search online for other museum photos of this style of quiver and found at least one more, probably from somewhere in Germany, and a bit earlier than the one at the Higgins Armory. While poking around online I also found a picture of a very nice looking reproduction of a quiver made by Robert MacPherson. So I sent off an email to Mr. MacPherson saying that I was trying to figure out how to make one, shared some of my ideas and things I was not sure about. His reply was very helpful and I made a lot more progress with my plans, but I did not have time to start on a new project since classes and buying a house was taking up a lot of my time. When I finally did start on the quiver, I tried to document my progress by taking pictures at various stages. My apologies for the quality of these photos, I took them with my cellphone and did not realize how fuzzy and washed out they were. I've corrected the color a bit on some of them, and plan on taking new photos of the finished quiver soon. This quiver has the special significance to me of being the first thing I made completely in my new studio/workshops. There are several things I feel could be improved if/when I make another, which I will discuss later.
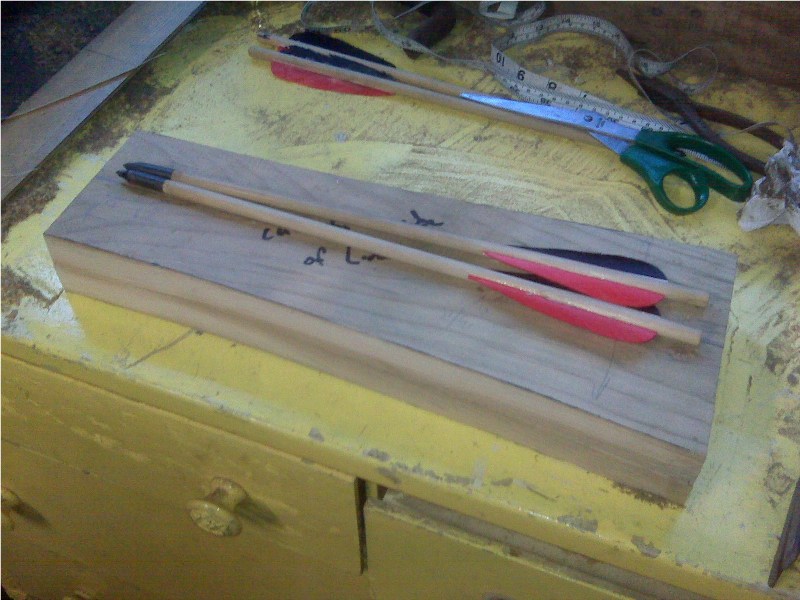
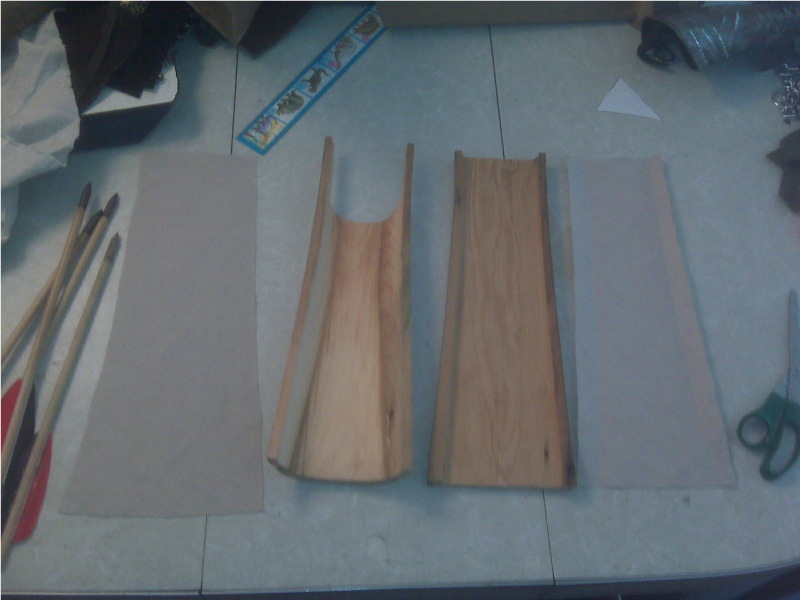
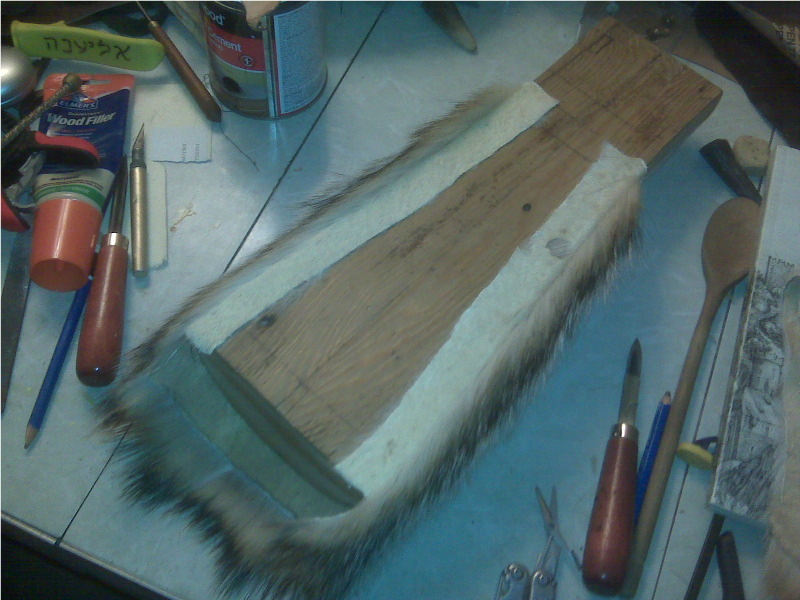
There were three things I needed (aside from an overall plan) to get started on making the quiver. These were a full size outline/projection of the wooden core's front/back, side, top, and bottom. These were drawn in my large sketchbook, then transferred to heavy paper and cut out. These are used to trace out the maximum dimensions of the wooden core onto whatever material I decide to carve it from... then I needed something to carve it from. I thought about a couple different things, like carving it out of a small log, split lengthwise and hollowed out on the inside; and about carving it from a block of wood with a panel glued on to cover the back, versus build it up from multiple boards glued together. Since this was my first one and I did not know if it would turn out okay or not, and because I had a big pile of boards from an old shed I demolished a few months earlier, I decided to build it up from multiple pieces of one-by-something (1"x6" maybe). Two of them would be thick enough for the front, and the back would be made with a third boar. I cut them all a little too long to give room for mistakes, planed them down to wood that looked like it hadn't been living with farm animals for sixty years, and glued together the two boards for the front with wood glue.
|
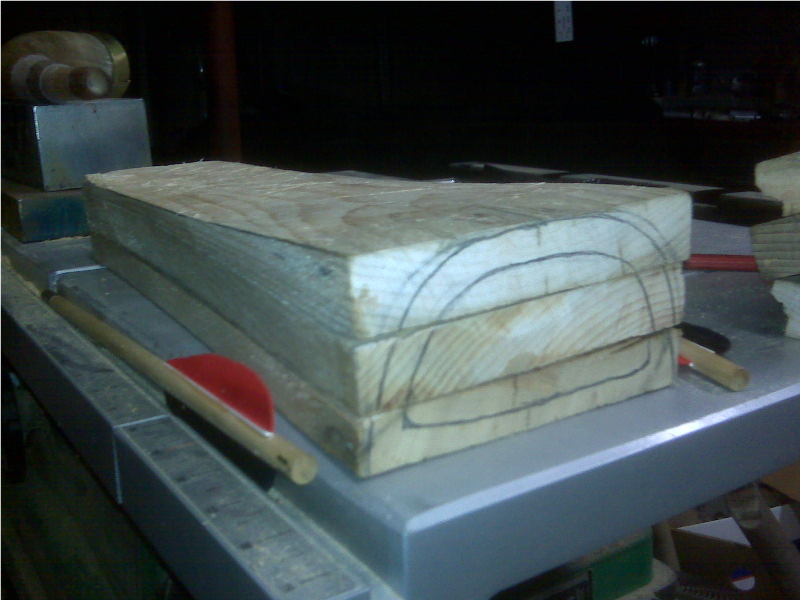
This is picture is of the two planks for the front glued together to make one block. Looking at the quiver from the front, it has a slight bell-like taper on the sides, which I traced onto the front and back (I traced it on both sides to make it easier to check that my cutting was even, not so necessary if I had bandsaw to cut it out with) using my template for the front outline. After tracing the template I held the quiver blank in a vise while using a draw knife to trim it down almost to the lines I had traced. I then evened it out with the flat side of a large rasp (this rasp is seriously the meanest looking rasp I have ever seen), followed by sand paper to smooth off the rasp marks. I also trimmed the separate piece of wood that will be back of the quiver so it matches the outline of the front. |

|
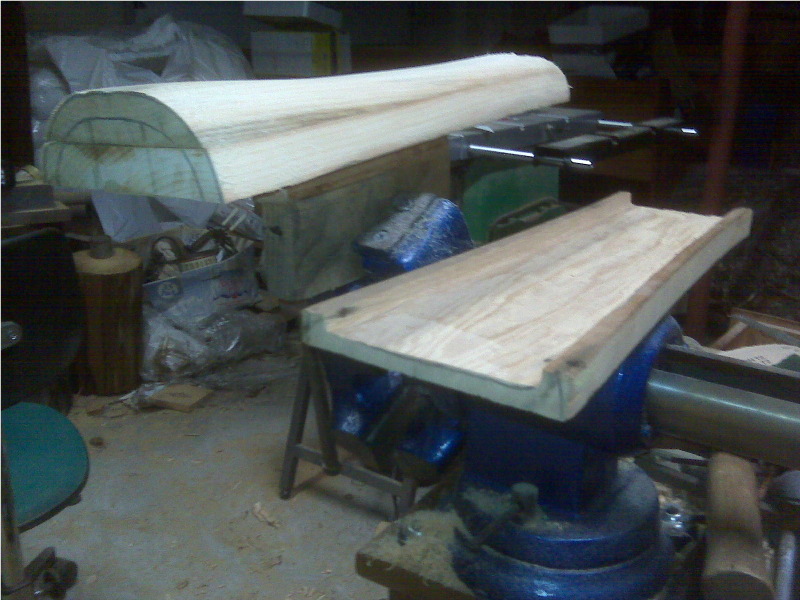
Here I have done a few more steps. I used my template for the side view of the quiver to trace out the slightly concave curve of the front/face, then shaved it down with a draw knife. In these two pictures the I have the blank for the front sitting on the piece for the back to show how I have drawn my guides for carving it down further. The first picture shows the end that will be the top, the second picture shows the end of the bottom. When I was making this blank I wanted to make it so that the amount to be carved away on the inside at the top would only be the thickness of the board on the inside. The reason for this was that while carving out the inside it would be easier to use the seam between the glued pieces as a point of reference to help me carve out the inside evenly, and judge the thickness of what I was carving. Thinking back on this, structurally it may have been better to shave the outside down about 1/16" overall, and leave about 1/16" more on the inside to keep the two pieces of wood laminated together better on the top end - but maybe it does not even matter since this part would have a big U shaped section cut out of the front before it is finished. |

|
These show how I was able to hold the front of the quiver with a vise so I could shape down the corners with a draw knife and rasp. Its just a couple chunks of wood screwed to the inside of the quiver blank, then clamp the wooden chunks into a vise... it was a little wobbly, but it worked. At this point the outside was not completely shapes, as the curve of the front is slightly convex towards the bottom, where it should be slightly concave. The second picture is a little blurry, but shows the back panel of the quiver after I carved out the inside with a chisel. The little box that is drawn on the bottom end of the blank is sort of a cutting guide that I'll write about for the next pair of pictures. |
|
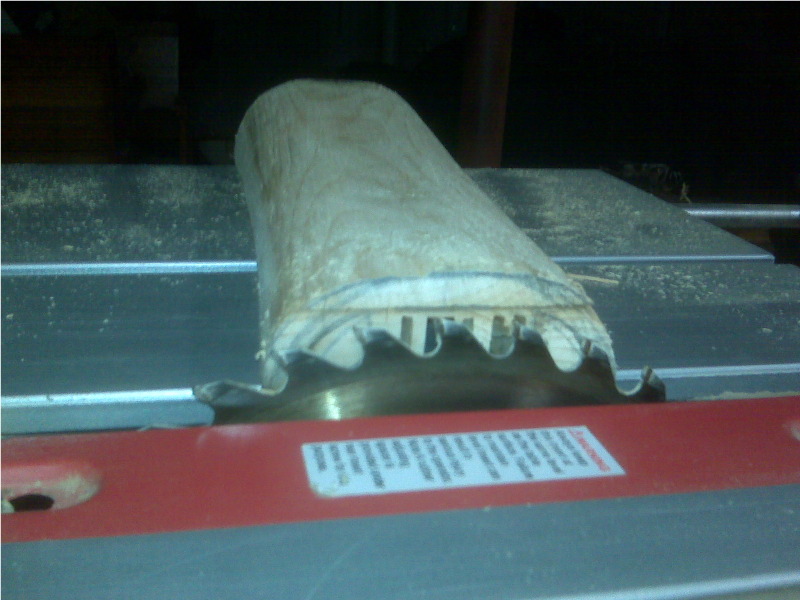
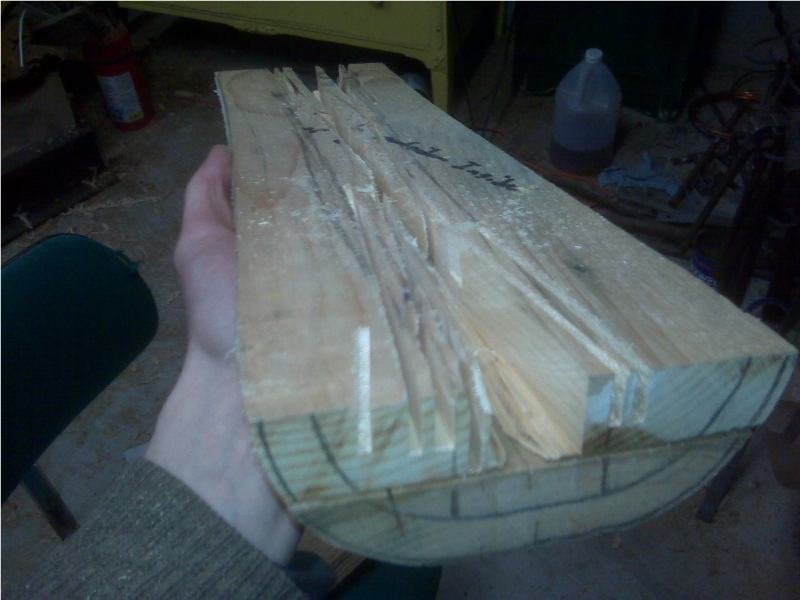
I used a table saw with the blade set to the same height as the thickness of the bottom board in my laminated blank (which as I mentioned earlier is the thickness of the negative space of in the throat of the quiver) to quickly rough out some of the inside. The little box that I mentioned above which was drawn near the center of each end of the quiver blank is marking the area where it is safe for me to run the full length of the quiver over the table saw without cutting into the walls of the quiver... sort of a safe zone where if I did not change the height of the blade I would not need to be too careful with my cutting. This alowed me to remove a lot of wood very quickly, and any slivery bits of wood left in that area would be easily with a chisel. |

|
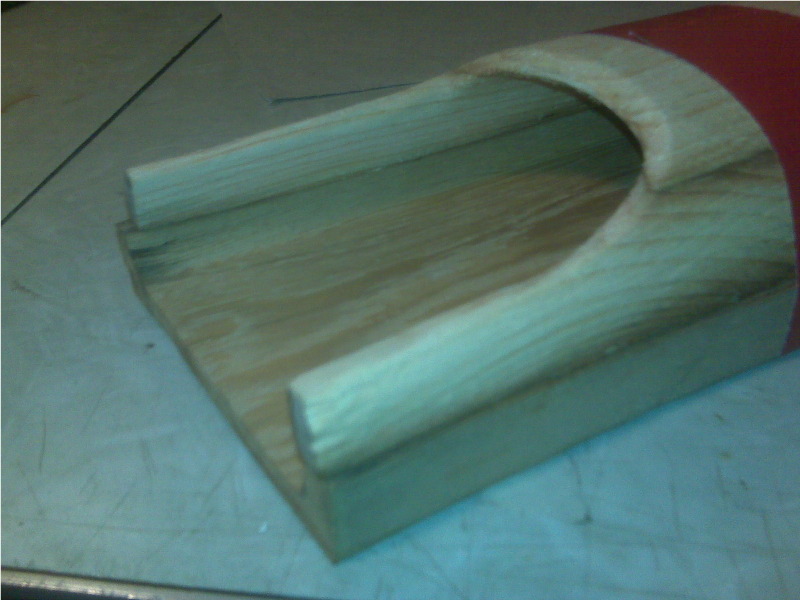
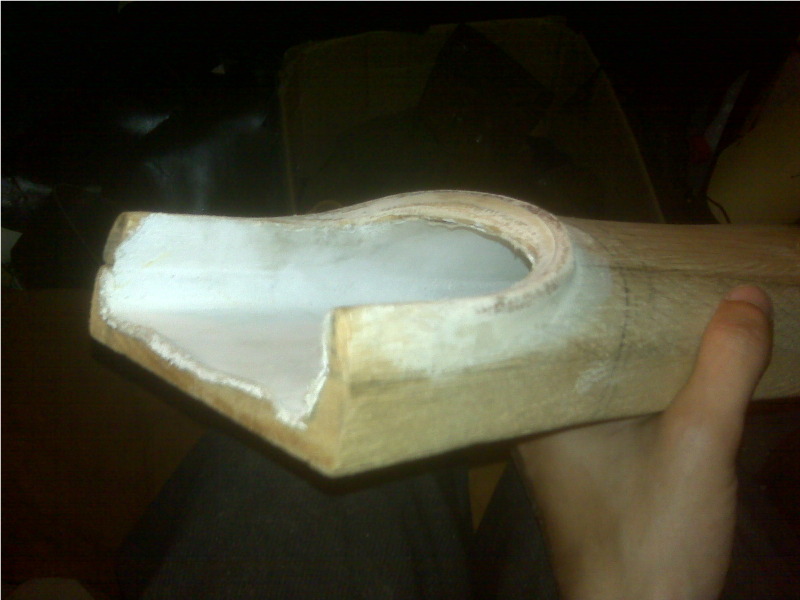
Now this felt like progress! I used a chisel to hollow out the inside. The U shaped mouth was drawn on with a pencil; then carefully cut out with a chisel and a lot of light tapping with a mallet, alternating working from the inside and outside. I then cleaned it up with my big nasty rasp. It felt like progress, but I still had a lot of refining to do on the inside and outside of both the front and the panel for the back. |
|
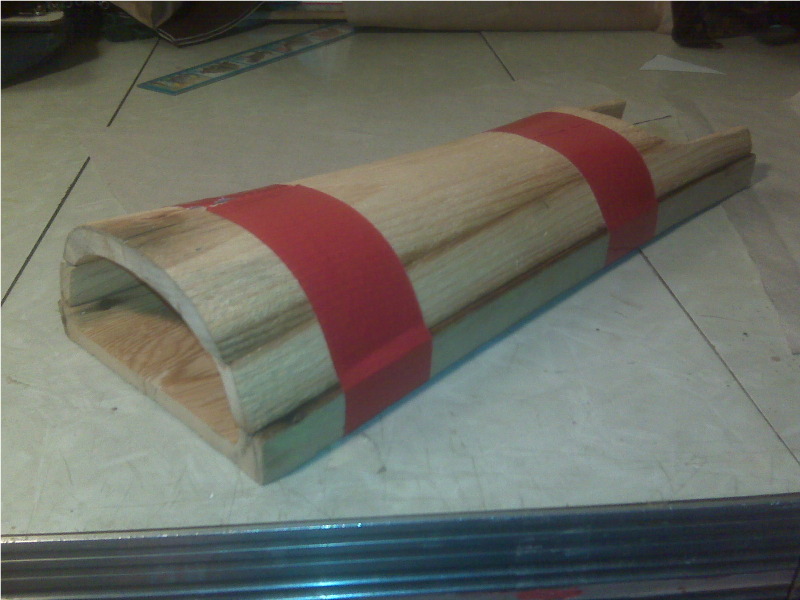
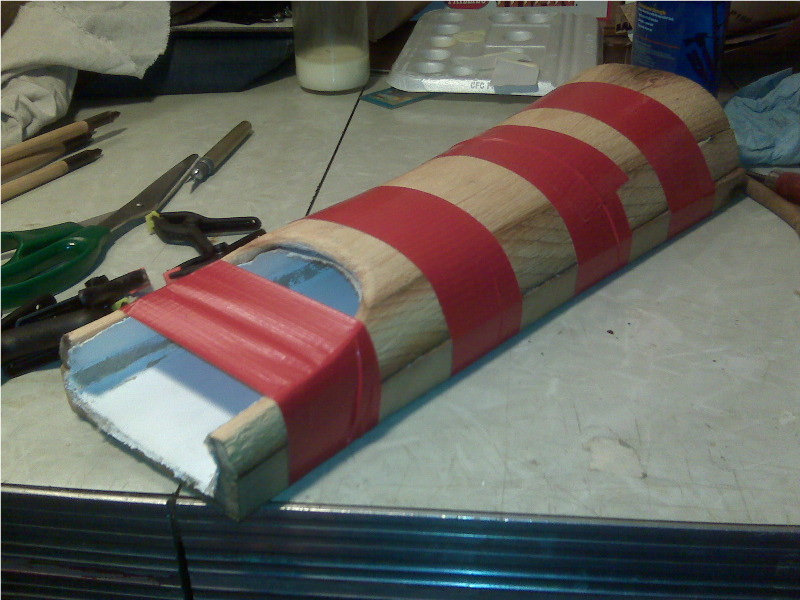
Oh no! my ends are uneven! Its good thing I left a tad bit of extra length on each end of my pieces. I used this lovely red duct tape to hold the parts together while I fixed the ends on a belt sander. In the background of the second picture is my holographic Dino-ruler, which is pretty awesome. |
|
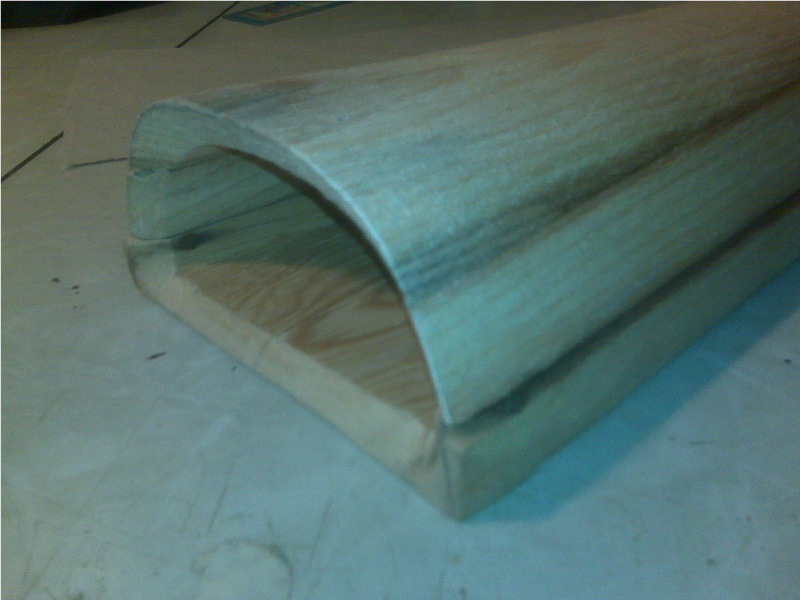
While these pieces were securely taped together was a perfect time to bevel the bottom edges of the quiver so a wooden bottom panel could be glued in place. I have no idea if this is how it was done in period, but I liked the idea of it because the angled sides would provide more surface area for the glue to securely adhere the pieces together. I used a rotary rasp bit chucked into my drill press to create the bevel. |
|
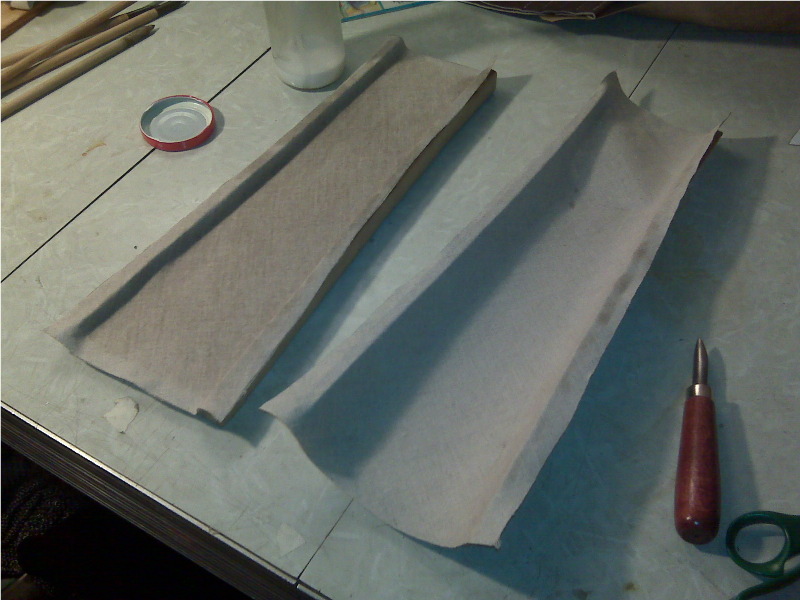
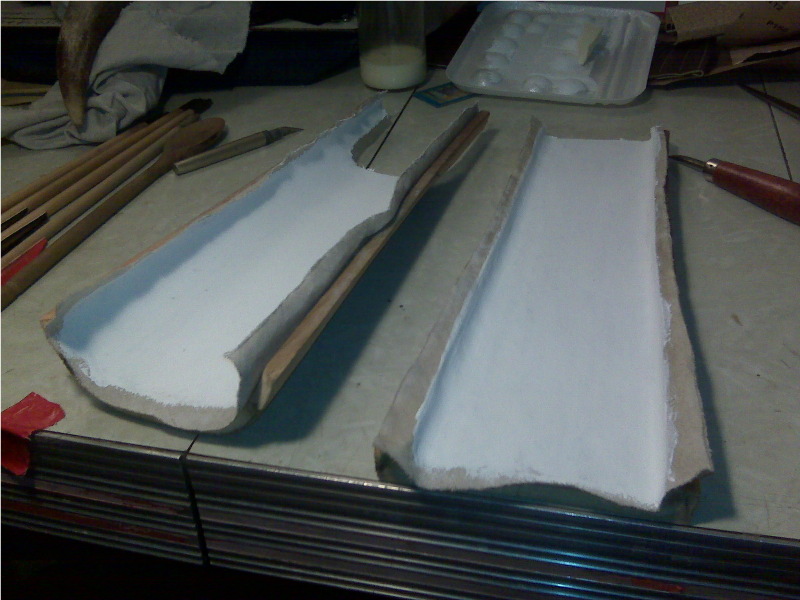
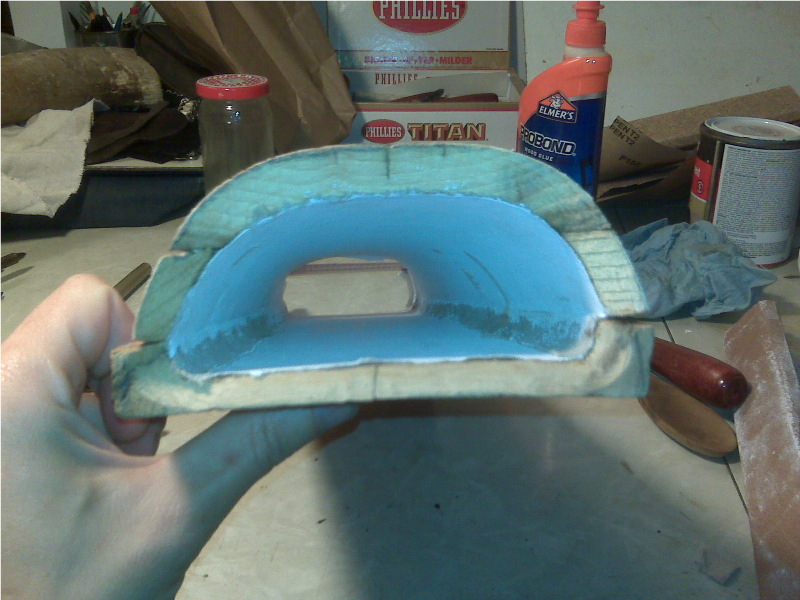
Up until this point I would occasionally take a break from other aspects of this project to go back to attacking the inside of the quiver with a rasp, or refine the shape of the mouth. Once I was happy with the shape of the mouth area, and thought the walls were about as this as I could safely carve them, I sealed the front and back parts of the quiver, inside and out, with ten or so coats of watered down wood glue... I wish I would have gotten pictures of that - that would have been cool. Instead, here are some pictures of the linen lining being glued in. In the first picture are the linings for the front and back after cutting them out. In the second picture are those pieces after gluing them in. I made them about 3/4" too wide on each side so when the quiver halves are glued together, the extra 3/4" wide tabs from one half can be glued to the other quiver because more surface area gluing the parts together would only be a bad thing if I wanted them to come apart, and I thought it best if they stay glued together. |
|
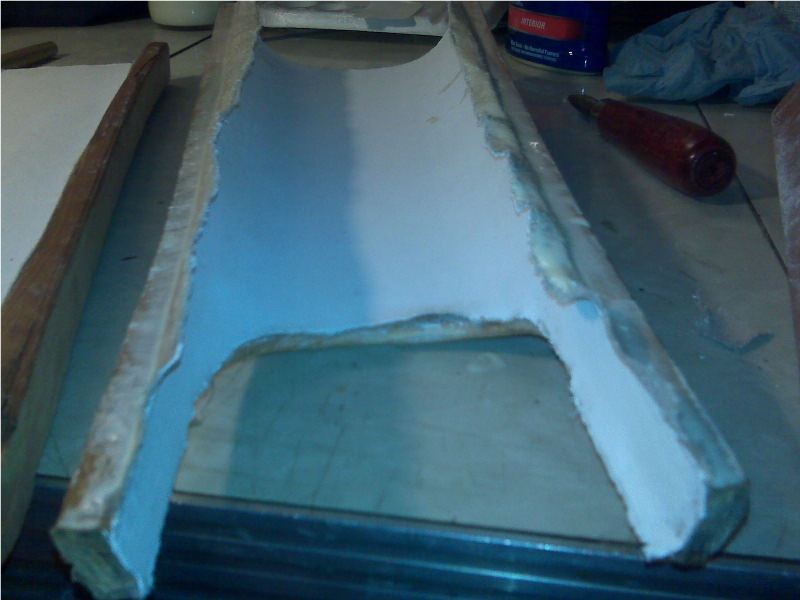
I should have said more about the linen lining earlier. The quiver at the Higgins Armory appeared to be lined with something, maybe parchment or vellum. It looked like it was painted with gesso or something similar that is now yellowed, cracking, wrinkling up, and peeling. I think vellum would have been a good choice of lining materials, but could not afford it at the time and had a lot of linen laying around. I had read that linen painted with gesso was used to cover the inside of shields to help seal them from moisture and keep the wood more intact if it split, so I thought that seemed like a feasible idea for lining the quiver. After gluing in the lining and cutting out the U shaped mouth section, I painted it with a few coats of gesso and sanded it smooth. The wet gesso caused lining to separate from the wooden core in some places, which was fixed by gluing it back down after the gesso had dried. |
|
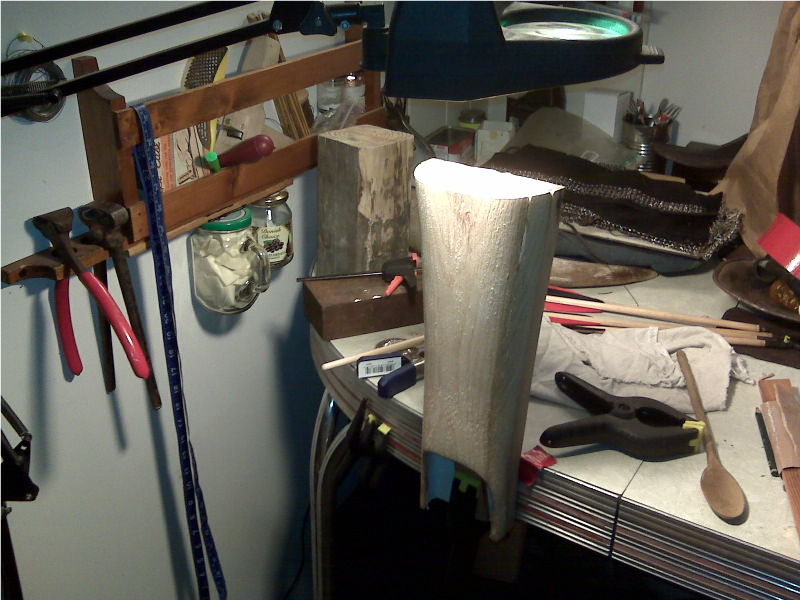
Time to glue the two halves together. I ran a bead of glue down the edges where it would be glued, then "clamped" the pieces together with a few tight wraps of duct tape. I then glued down the linen tabs along the inside of the seams by brushing the glue in with a long paintbrush and burnished them down with a wooden dowel. I would later use a long paintbrush to apply a few layers of gesso to the tabs, and sand them smooth with some sandpaper wrapped around a dowel. |
|
I did not get a good picture of the piece I made for the bottom of the quiver, but it was really simple... I sat the assembled quiver parts on part of a broken wooden wine box and traced around the bottom with a pencil; then cut it out with a jig saw. The edge was then beveled with a belt sander and adjusted until it fit snugly into the bottom of the quiver. I glued it in place with wood glue, then clamped it to my leather working table as it is shown in the picture. I also had a small steel weight (a random old hammer head) on it two apply some pressure, and the light right over in hopes that the extra warmth might speed up drying time. Once the glue was fully dried I did some final shaping on the outside and painted it with a couple more coats of watered down glue to seal it up some more. |
|
All of the (frustratingly few) examples of this kind of quiver that I could find online or see in person had sort of a raised lip around the mouth area. For ease of carving the rest of the quiver I decided to build up the lip after shaping the wooden body of the quiver. The lip is made up of a 1/4" by 1/4" strip of leather that was approximately the length of lower half of the U shaped mouth opening. I shaped the leather with a skiving knife and an aquatint scraper until it could be wrapped around the bottom of the mouth opening and be flat against the quiver, then shaved down leather strip so the last inch or so of each end had an even taper. I glued it in place with contact cement, then filled the gaps around the edges with wood filler. After everything had dried I used a file to shape it too what is shown in the picture. |

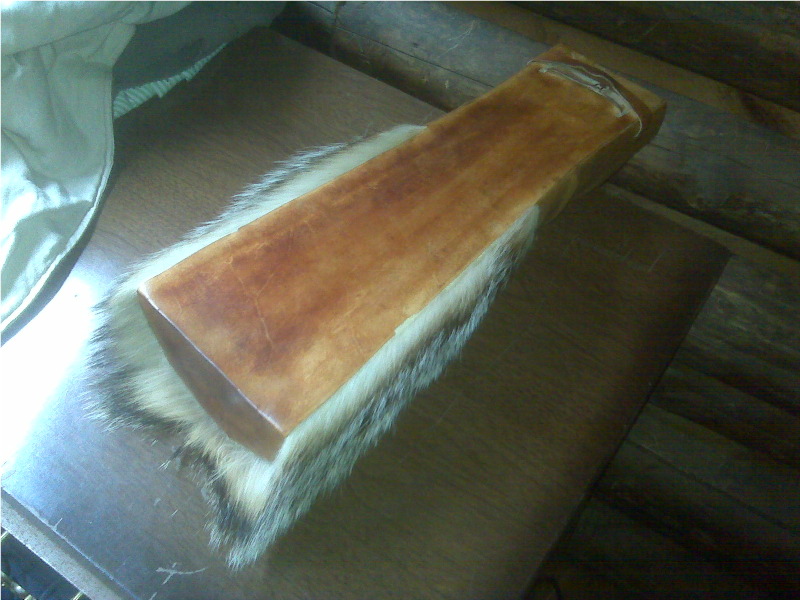
| In a couple of the last pictures you may be able to see a few more pencil lines on the outside of the wooden parts that I have been working on. Those were drawn onto the quiver while making the pattern for the badge skin cover. I started drafting the pattern by outlining the area that would be covered by the skin, and took measurements from that outline. I then made a paper pattern, and from that I made a mock-up out of a scrap of wool (I wanted to use a material that was about the same thickness as the badger's skin). After checking the fit of the mock-up, and making some adjustments to my pattern, I traced it onto my badger skin and cut it out. I glued the badger to the wooden box with some barge cement. |

| Here are a couple pictures of the back and bottom of the quiver, with the badger glued in place. The skin wraps around the back and bottom of the quiver about an inch, and I shaved off the fur on the back and bottom so those areas could later be covered with smooth leather. The first picture was before I folded the skin over the bottom and glued it down, the second picture shows what it looked like after the bottom was glued down and shaved. |

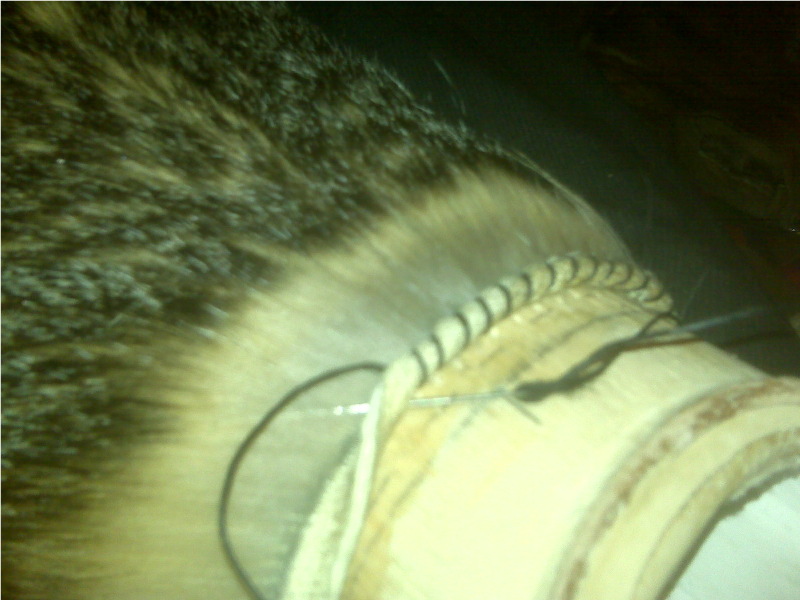
| I was unable to find enough examples of period quivers to feel like I had a good survey of many of the details. One detail that perplexed me was a second raised lip around the front of some quivers. One practical thing that I thought this bump could be was that maybe the top edge of the badger skin had been sewn into a small roll. I thought that maybe this roll would help keep the top edge of the skin from slipping out from under the leather that would later cover the top of the quiver. I liked the idea and thought trying it would be more interesting than not trying it, so there it is... To make the little roll, I started by shaving the fur off the area that would be taken up by rolling the edge. I then used an awl to punch stitching holes along the edge of the shaved part, and sewed it into a roped looking roll using waxed linen thread for what I guess I would call a spiral stitch. |
|
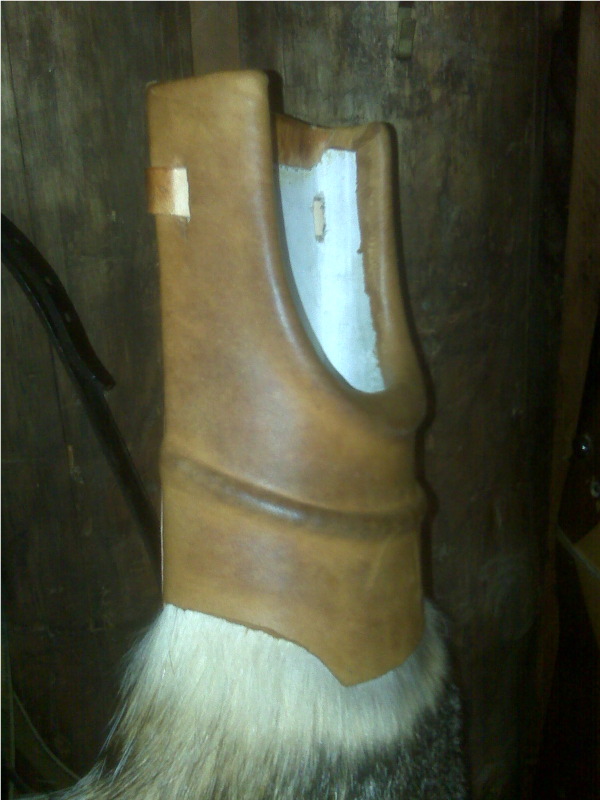
The final steps were to cover the top, back, and bottom with leather; then make the holes for belt loop, and make the belt loop. The top was done first, so that the leather on the back could overlap the edges in the same way that it would overlap the parts of the badger that wrap around to the sides to the back of the quiver. I wish I would have gotten a couple more pictures of this, but it went really fast and I was sort of caught up in the excitement of finishing the quiver. I used deer shin for the top, chosen for its flexibility and how it felt like it would easily conform to the curves. I made a rough pattern by holding fabric around the top of the quiver and marking where certain points were on the fabric. This top piece only wraps around the back-sides about 1/2", and around the inside of the mouth about 1/4". The leather for the back and bottom is one piece of 2oz vegetable tanned cow. I marked where the 90 degree bend would be along the bottom edge of the back, and scored a line on the inside of the bend with an engraving burin so it would fold sharply. The edges of all leather parts for these last steps were skived to keep the edges from looking thick and bulky. I wish that I would also have thought about skiving the edges of the badger so they were less visible under the outer layers of leather.
One more thing: belt loop holes... these were easy to make. I used an awl to outline where I wanted them on the outside of the leather, cut away the leather on the inside of my marks. Once I had bare wood exposed, I drilled them through with an electric drill (two holes with the drill per belt loop hole...) then used a small chisel and a file to shape the holes into rectangles measuring about 3/16" wide by 1/2" tall. There are four of these holes - one on each side of the quiver, at about 1/4" in from the back; and two at opposite sides of the back, about 1/4" in from the sides. A half inch wide leather strap is then threaded through the holes, starting by going in one side and out the back through the nearest hole (the one that is about 1/4" away), then across the back of the quiver and into the other hole through the back, then out the nearby hole in the side... pull the strap through so the ends are even, and sew the long ends so they overlap on the back. This makes a horizontal strap across the back of the quiver that works nicely as a loop for hanging a quiver on my belt. The last one is a picture of my wall of hunting goodies in my bedroom. |